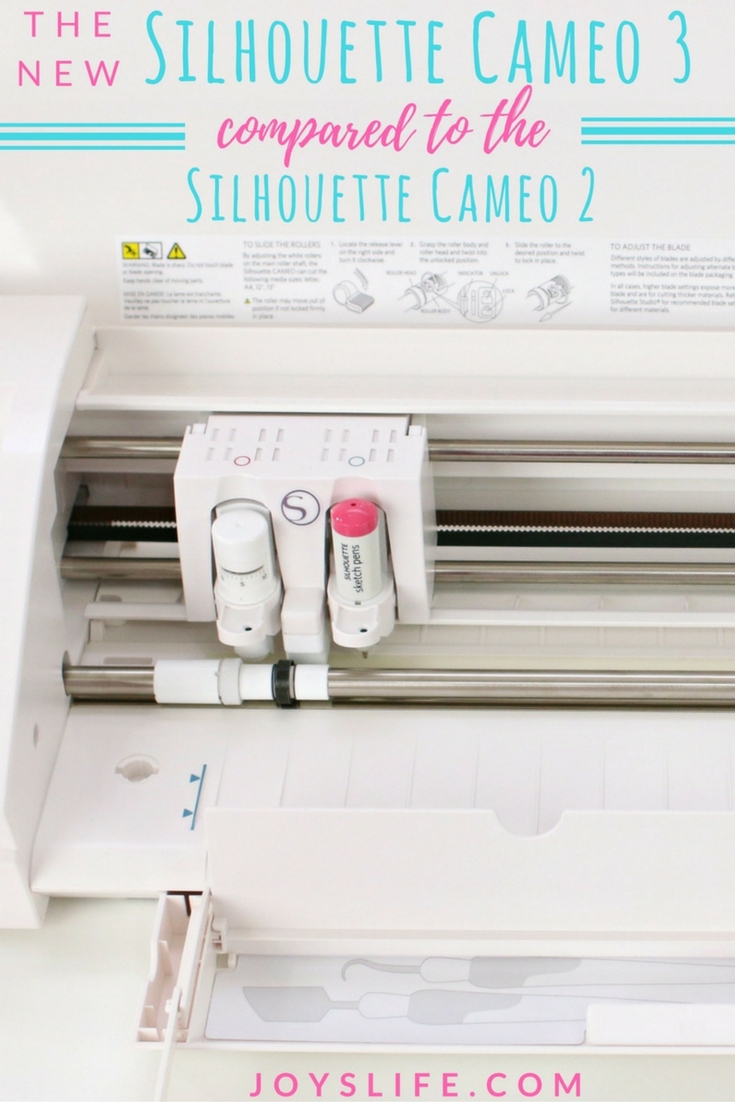
Using the Silhouette’s Print/Cut ability opens a ton of new and fun crafting opportunities. It’s not hard to do once you learn the basics! By the way, I am using a Cricut mat in my Silhouette Cameo. It works great!
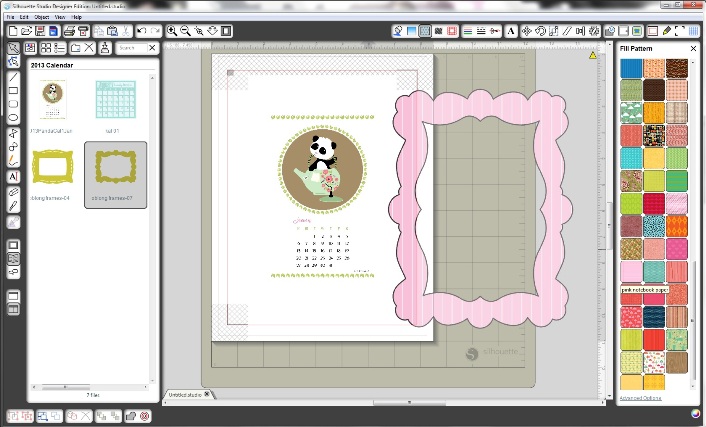
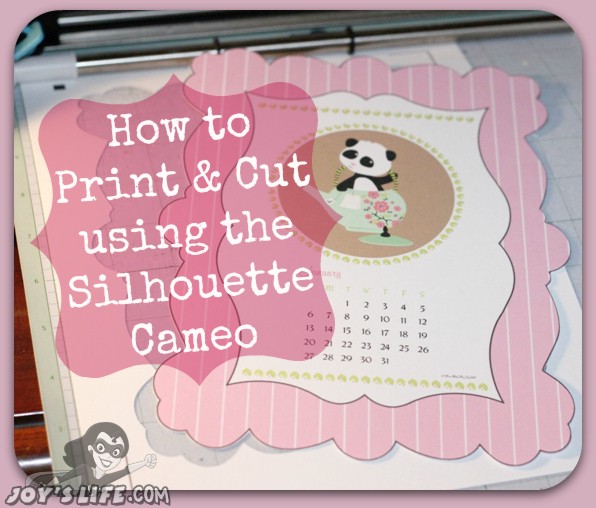
Step One: Import the files you want to use. There’s help for that if you need it, on my Silhouette Tutorials page. I’m using the Lettering Delights Pandarama 2013 calendar and putting a frame from the Oblong Frames set around it to give it a different shape. I changed the frame by adding a pattern fill. Learn to do that here.
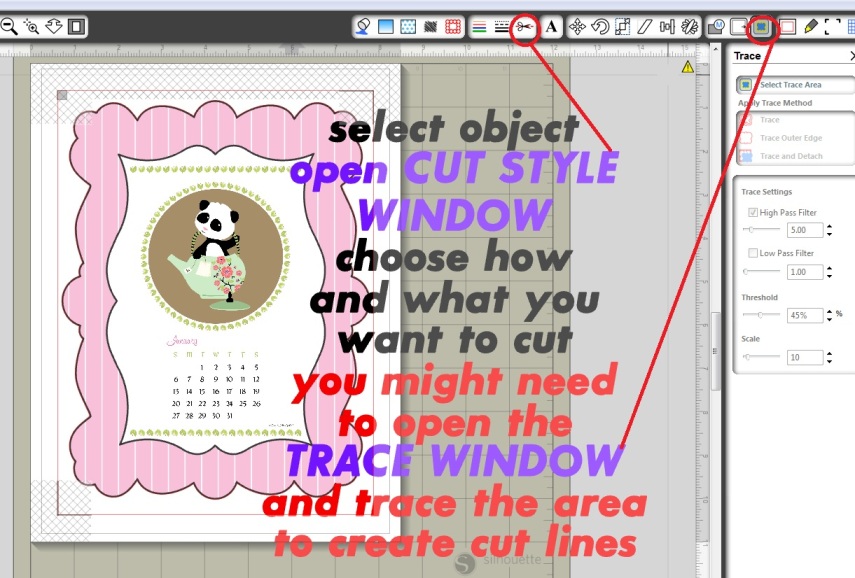
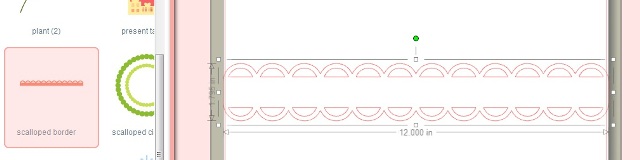
Once you have everything laid out the way you like it, it’s time to see if it’s going to cut where you want it to be cut. Step Two: Select the entire object want to have cut. With that selected, click on the “Cut Style Window”. It looks like a pair of scissors.
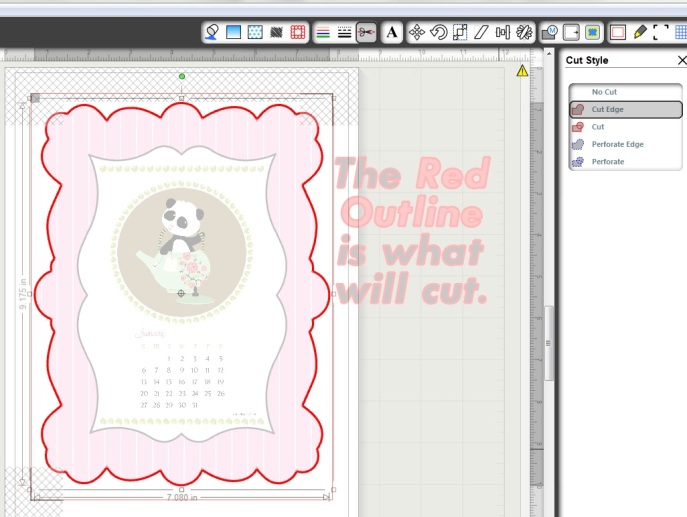
The “Cut Style Window” shows you, using a red outline, what will be cut. Step Three: Choose from “No Cut, Cut Edge, Cut, Perforate Edge and Perforate” to determine the way you want your lines cut. Don’t see any cut lines? You might need to create them. Click here to learn how to do that.
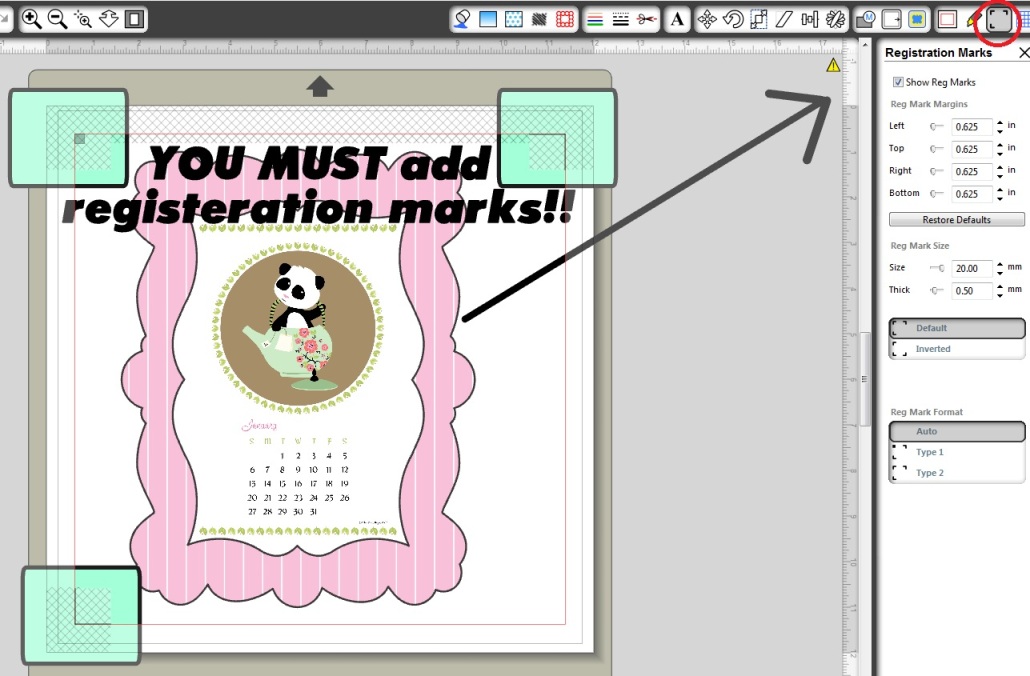
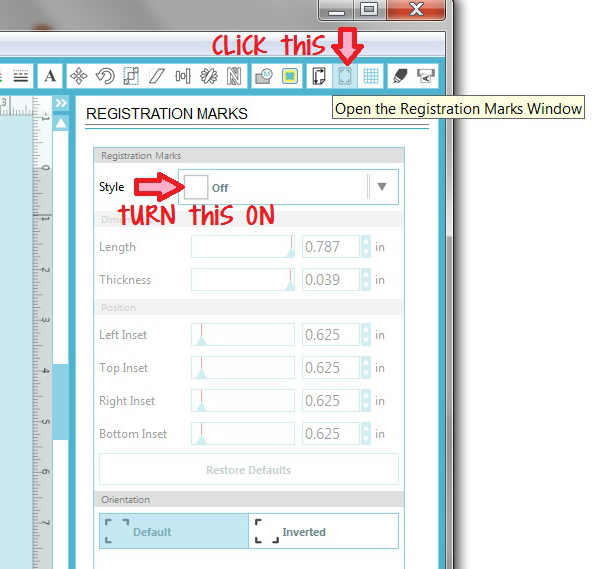
Step Four: Make sure to click on the registration marks button to add them to your project BEFORE you print it. Why? Because these marks are what the Cameo reads to know where to cut. Without the marks your machine will cut wherever it darn well pleases…or not at all. Click the “Show Reg Marks” box so you can see them.
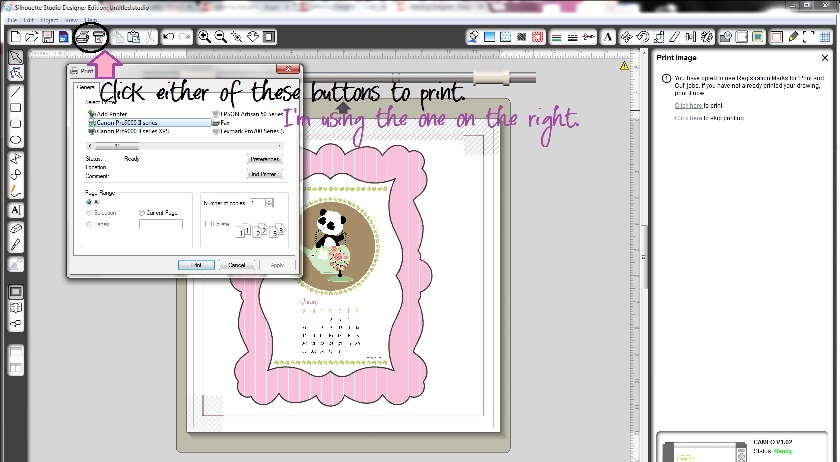
If you’re happy with your layout and cut lines it’s time to print! Step Five: Click on the “Send to Printer” or “Send to Silhouette” buttons. I like using the “Send to Silhouette” button when I’m planning to cut right after printing. That’s what I’m using now.
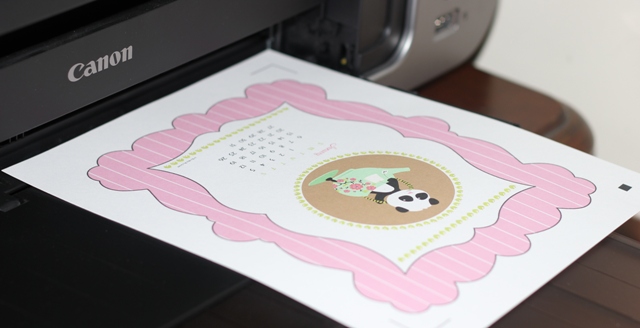
Step Six: Print. You can see that my project has just finished printing. See the registration marks? Yep. They’re printed on there just like they should be.
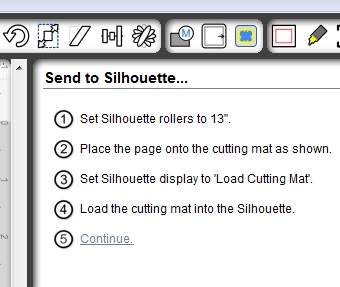
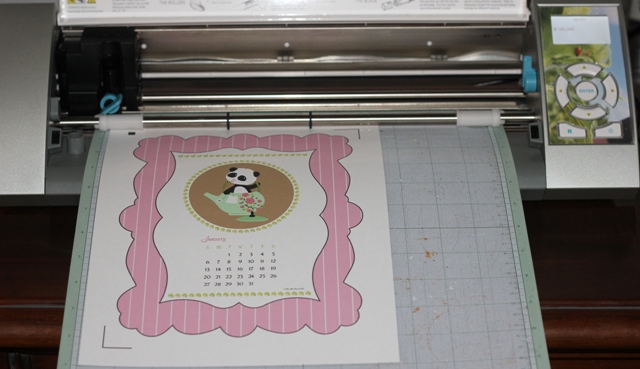
Now that you’ve finished printing you need to cut. Step Seven: Put your project on your mat and load it into the Silhouette. Make sure that you place your project on the mat with the direction of the registration marks lined up like they are on your screen.
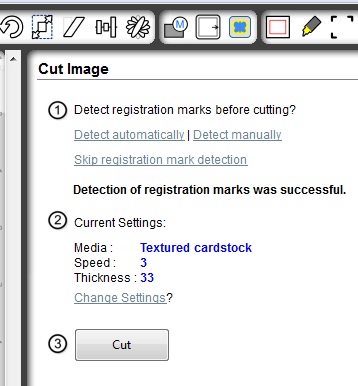
Step Eight: Click the “Detect Automatically” link so your Silhouette will look for the registration marks. You can see that I’ve already done that and I have received the message “Detection of registration marks was successful” just above the #2 in the photo. Step Nine: Make sure your current cut settings are the way you need them and then click “CUT”.
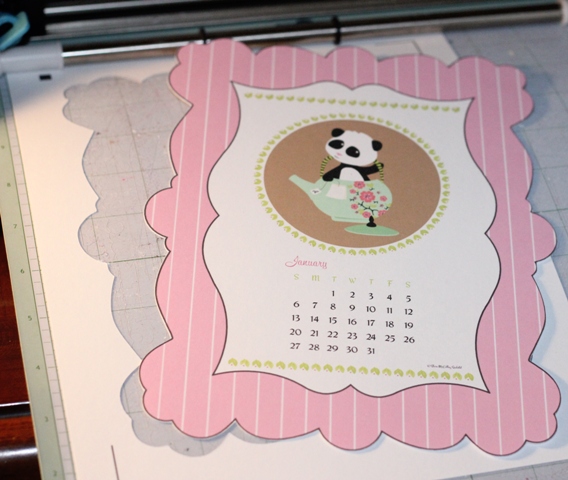
The Cameo just finished cutting out my calendar!
TA DA!! A printed and cut project using the Silhouette Cameo. YAY!
I hope this tutorial helped you! Be sure to check Silhouette Cameo Tutorials for more help.
Have a Great Day!


Thank you thank you thank you!!!! Great tutorial.
You’re so welcome, Linda! Thank you for leaving me a comment! 🙂
Super hugs,
~Joy~
Joy, I’m so glad to have found your site! Learning so much more about what I can do with my Cameo! Question – what kind of printer do you use? I’m looking for something new that’s going to print great quality and color. Thanks so much!!
Hi Lauren! . It’s a great printer! It uses separate ink tanks for each color, which helps cut down on ink costs since you can just replace the one you’re out of. It prints 12×12 and has a ton of different settings depending on the project you’re doing. There’s a newer one out now called the Pixma Pro-100. If I were in the market for a new printer, I would try the new Pro-100. I’ve had my printer for a year and have never been disappointed with it. I hope that helps!
I use the Canon PIXMA Pro9000 Mark II Inkjet Photo Printer
~Joy~
Hi,
I tried to use the print and cut feature for the first time, last night without any success. I printed what I wanted to cut, but there were no cut lines. I added cut lines and it didn’t cut correctly. It actually cut a line through my image. Also, do you have to trace the image to cut it out?
Hi LeShay,
Sometimes you have to trace the image to create cut lines. Here are two tutorials that might help you: How to Make Imported SVG Files Cut in Silhouette Software and How to Use the Offset Window to make Cut Lines. This tutorial might help you too. It shows how to trace and create cut lines. I hope that helps!
~Joy~
I’m so glad that a friend directed me to your site today…so much helpful info and i can’t wait to read it all!! Thank you, thank you!!
Jennifer S.
Hi Jennifer,
Thank you so much for that awesome comment! I really appreciate it! Let me know if there is anything I can help you with…and say thanks to your friend for me! 🙂
~Joy~
Hi there! I’m so glad I found this tutorial; it’s the best I’ve found on using the Print and Cut feature. I noticed that you used the Cricut mat instead of the Silhouette one. I’ve been having trouble with my Silhouette mat and it being too sticky for the cardstock I’m using. Does using the Cricut mat help with this? I’d appreciate any advice or help you might have. Thanks!
Hi Molly!
I’m so glad that this tutorial helped you! Thanks for letting me know that it did. 🙂 I like using my Cricut mats because they’re stronger than the Silhouette ones, plus I have a bunch of these Cricut ones. LOL! However, when I first start using my Cricut, or any of my other machine mats (Silhouette, Sizzix Eclips, KNK Zing) when I first get them sometimes they are uber sticky. What I suggest is placing your hands on the mat and lifting you hands up, put them back down again and lift. Repeat that until it’s less sticky. Some people will even put a shirt or some fabric on the mat and lift it to remove the stickiness. You have to strike a good balance of making it less sticky and making it not sticky enough. I think mats try and drive us crazy. First they are too sticky, then they are not sticky enough. It’s an endless cycle. LOL! Good luck!
~Joy~
Hi Joy, I noticed you used the cricut mat, which I do for regular cutting and its always off a bit, any special instructions on using the cameo mat, on print and cut, placement the same?
Hi Debi,
I load the Silhouette mat same as always and it always does a great print/cut. 😉 I hope that helps!
~Joy~
Thanks. Love the visuals.
I am having trouble with it not reading the registry marks and I have to keep pressing it until it does or unload and reload and try it again. Then when it does cut it doesn’t cut properly. Or I create a page. Print. Detect Register. It cuts perfectly. I change some of the wording on the page or save it and come back to print more another time and it increasing the cut in size. Suggestions?
Hi Cathy,
One thing that has worked for me is making sure that there is enough light shining on the front of the machine so that the marks are well illuminated. You might even point a small lamp in that direction if you’re cutting in low light, shadowy area or time of day.
Curious why you like the Cricut mat better then the Silhouette one? Does it line up exactly like it should or do you ever have any problems using it? (Any tips?)
Hi Toni!
I like the Cricut mat (the old style that I still have a bunch of) better than the Silhouette mat because they are stronger. I never have this problem. Hope that helps!
Hi Joy! Thanks for the tutorial and printer recommendation! I got the PRO-100 but I’m having trouble with the colors being off. I read on a photography forum to set to the paper manufacturer setting but I rarely print on photo paper. I was wondering what setting you use for printing on card stock, do you use “plain paper”? Any other tips/advice? Any help is appreciated – thanks!!
Hi Vanessa,
I most often use this cardstock and set it to plain paper with regular print (not fast/quick print). By the way, the paper I use used to cost about $6 a ream. You can still find it for that at some office supply stores and Costco. I hope that helps!
Thanks Joy!
This might be a dumb question but I am trying to make a invitation using this technique but I can’t figure out how to not cut the center square? I have adjusted the cut line and it still cuts out the center.
Hello Joy – I’ve been following you for several years of cricuting. I was so happy to know you had a Silhouette Cameo and Zing (which is still in the box). I just purchased the Cameo and while practicing I cut two large Easter eggs right through my new mat. I’m still intimidated but thanks to your clear and visual tutorials I feel more confident of the process. Take care,
Judy
Hi joy, thank you for this. Wish I’ve seen this page before yesterday as I cut a design by hand coz I thought its impossible if it’s a picture. Anyway, are you using regular studio or upgraded to designer?
Thanks!
Hi Christina,
I’m using the Designer Edition. I highly recommend it! I paid $50 for it when it first came out but you can find it here on Amazon for $34 (as of today). Happy Crafting!
Thank you so much for your help. I can now print with my silhouette cameo.
YAY! You’re so welcome, Michelle! Happy crafting! 🙂
Just got my first cutting machine, which is the Silhouette Cameo, and learning how to use this machine! I am glad I came across your blog. THE best tutorial! You are the ONLY one I’ve read that explains why the registration marks is needed and every single step with explanation. THANK YOU!
Hi Jen,
Thank you so much for your awesome comment! I’m so happy that my tutorial helped you! YAY! Let me know if you have other Cameo questions. 🙂 Happy Crafting!
~Joy~
Wow, I’m such a dunce. I didn’t realize until I read through your tutorial that you actually needed a printer and the Silhouette! I mean, I have an everyday printer, but nothing special! I actually thought the Silhouette did all the above! I’ve purchased all these files from the Silhouette store that require color & cut!
OMG, I really need to read the directions. I’ve had this thing since Xmas, when I HAD TO HAVE it and yet is sits…. I will definitely be bookmarking your page for more tips. Thank you Joy.
Hey Karrie! You’re not alone at all in thinking that. When a machine says that it can print and cut, most people think, awesome! I’m done! Honestly, I think companies ought to make it much more clear that you need a printer to make that work. Hello companies…they created BOLD lettering for a reason. Check it out. LOL! Karrie, soon you’ll be on your way printing and cutting up a storm. Happy crafting, my friend! 🙂
Hi! Great tutorial! I’ve been thinking of buying a Silhouette Cameo because I want to be able to create tags and invitations but my friend said it only cuts but doesn’t print. So it sound like in order to make an invitation I would need a Silhouette AND a printer to print out the words and letters?
Hi Pam! Yes, you will need a printer in addition to the Silhouette Cameo if you want to print something. I use this 12 x 12 printer but any printer will work fine. You’ll just need a 12 x 12 if you’re going to print things that are that size. 😉 Another great printer I use is this Canon PIXMA. Both are great!
normally when i use the cricut mat I line up my vinyl/paper on the far left line little farther than what your picture shows. When loading your mat for the print and cut do you line up your matt to the first short line or the one right next to it that is longer (hope that makes sense). I’m having issues with it being a little off when it cuts. thanks!
Here’s a question for ya, (like you have nothing else to do 😉 ) Is there a way to move the onscreen 8.5×11 page on the onscreen 12×12 mat so you don’t have to cut in the same area each time? I’ve looked and looked on the internet but didn’t find anything.
Love your page! Explains things perfectly! This may be a dumb question but do I have to have an inkjet printer? Or can I use a plain cartridge printer?
Hi Bailee!
Thank you so much! That’s not a dumb question at all. You can use any kind of printer. Now here’s sort of a dumb point from me, though it bares mentioning…just remember that if you want to print 12×12 pages you’ll need a 12×12 printer. That’s cause for a “duh, Joy”, isn’t it? 😉 I use this one. Happy crafting!
I got a Cameo for Christmas (yea!) and have been experimenting the last couple days. I have a really dumb question – can you explain the difference between “cut” and “cut edge”? I know it should be obvious, but I am not sure which one I should be using when.
Thanks!
Hi, I was successful in getting my print to cut but I also wanted to weld it. It was a bunny rabbit and duplicated the image and flipped it and tried to weld the bottom so it would make a card. The weld option was not active and I still haven’t worked it out. Any suggestions?
Hi Eve,
First, make sure that the pieces you want to weld are overlapping. Sometimes you might need to ungroup an image in order to weld it. Try selecting the whole image and choosing “Release Compound path”. Sometimes, depending on the complexity of the image you might need to ungroup again after doing that. You should be able to select the pieces you want to weld after that. I hope that works!
Hi, Vanessa – I was wondering if you got this worked out? I just purchased the Canon pro 100 and I also am having the problems of my colors being way off when printing from studio designer? I am printing on cardstock for print and cut designs and am very frustrated with the reaults. Just thought I’d check in here and see! Thanks!
Vanessa – I was just wondering how you are doing with your printer and if you got this resolved. I recently purchased the Canon Pro 100 after reading great things about it, including Joy mentioning it here! I am having the same problem you were having printing on plain white cardstock from Silhouette Studio – the colors are really off!!! Just thought I’d check in here and see if (and how?) you resolved this or if anyone else has any suggestions! Thanks!
I am having a problem with this. When I click the scissors it erases whatever I have selected.
HI. I SEE IN YOUR POST THAT YOU HAVE A PRINTER THAT PRINTS 12″ X 12″ PAGES. I ALSO HAVE A WIDE FORMAT PRINTER AND WAS WONDERING IF THERE IS A WAY TO PRINT FROM THE DESIGN STUDIO IN 12″ X 12″? IT SEEMS THAT THE PRINT RANGE WON’T GO LARGER THAN 8.5″ X 11″ AND I WOULD LOVE TO PRINT MY OWN 12″ X12″ PAGES WITH THE PATTERNS I’VE PURCHASED FROM THE DESIGN STORE. THANKS IN ADVANCE FOR ANY INFO!
(Sorry my last comment was all in caps. I assumed because my name and email were auto caps that my comment was too. Just the caps lock…oops!)
Hi! I’ve been using my Silhouette to make stickers using Print & Cut. Everything has been fine except for when I go to cut it’s not cutting exactly where it needs to cut on the top of my design. It’s slightly off but this causes there to be a little white space. Not sure what to try to resolve it since the rest of the image is being cut correctly. I was using the Cricut mats and thought it was because of that so I went back to the Silhouette mats but it’s still happening. I was thinking of creating an internal offset as close to the current lines now to see if that would solve the problem. Any suggestions would be greatly appreciated.
Is it possible to pull a label from the Silhouette store and print my own sentiment on it before I cut it out? Thank you.
What I’m trying to do is type my own sentiment onto a label in my library and then print it out. Is that possible? Thanks so much.
Hei,
An awesome tutorial you made!!! After 2 years with my Cameo it was today after finding your tutorial that I dared to try print and cut!! ;O)).
I have been doing all after your indications, but if I print a usual image from my computer, and get the marks as it will…how do i make to choose about detection of the registration marks?I do not get the option, it just try to cut a usual file, without asking me anything else… Have I missed something??
Hope you can help me…since now I am so close!!
Thanks for your tutorial and help!
Maria
Hi Maria,
Just make sure that you have created cut lines for the image you imported if it didn’t already import with some. Once that is done you can turn on the registration marks as seen in the image I’ve included. I hope that helps!
Hi Joy,
Thank you for the tutorials, they are great. I just got my cameo a month ago and I’m having trouble cutting my pictures. I print my pictures (i have an hp envy 4500) but when I put it into the cameo it won’t cut like your picture is always out of the edges or inside the edges messing up my print. Maybe I’m doing something wrong can you help me please. I’m trying to print a cut tags for my daughter’s birthday party.
Hi Isabel,
The main thing I think you need to check is that you’ve created cut lines that are around you item and where you want them. Here’s a post about using the offset button to create your own cut lines. Here’s another post about cut lines that might help too. The other thing to check is that your machine is set to load the cutting mat and not media.
I hope that fixes your problem. Happy crafting!
So I am not really following because you have the registration marks fitting a letter size page and then it goes to 12×12 size page but prints on a letter size page with the registration marks around it (which is not in the same place at 12 x12 when its time to print). Your image on the letter size is in the has marks and I thought that nothing could be in those locations. Please explain.
GOOD MORNING,
I JUST RECENTLY BOUGHT A SILHOUETTE CAMEO AND HAVE ONLY BEEN USING IT FOR ABOUT 2 WEEKS NOW. I’M HAVING TROUBLE PRINTING MY IMAGE. I’VE IMPORTED A .JPEG INTO THE SILHOUETEE CAMEO PROGRAM, LOADED MY GLITTER PAPER AND SENT TO PRINT. BUT IT’S SAYING CUTTING COMPLETE AND ON THE CAMEO IT SAYS JOB COMPLETE.
PLEASE HELP!!