How to Adjust Stretch and Turn Patterns in Silhouette Software

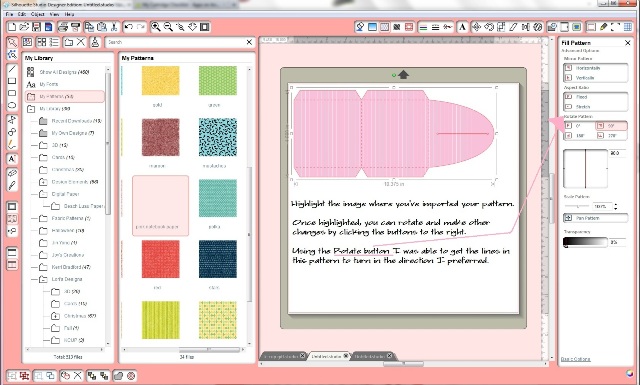
I was working on a project where I needed some paper that I didn’t have. Solution? Print out my paper and use the Silhouette Cameo to cut it out. YAY! While I was just soooo proud of myself for finding a cute printable paper pattern for .79, I realized that when I imported it to fill my project image it was turned in a direction I didn’t like. Have you had that problem? Well, here’s how to solve it!
By the way, to add a pattern you simply click on the object you want filled then click on a pattern.
HOW TO…
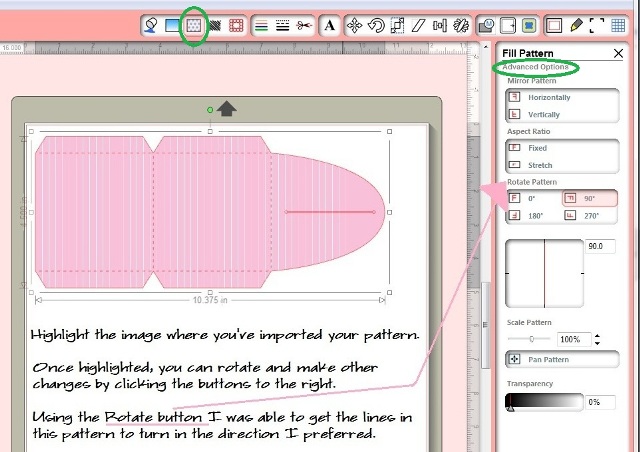
Here’s how to adjust (stretch, turn, etc.) the pattern:
- Highlight the object where you’ve imported your pattern.
- Open the “Fill Pattern” window. “Fill Pattern” is at the top of the screen in that little box that has polka dots in it. (I’ve circled it in green.)
- Now the window will open on the right side of your screen. Scroll to the bottom of that window and click “Advanced Options”. That’s how you’ll get into the window I have open in the photo above.
- Now you can rotate and make other changes under the “Fill Pattern” option. Remember to highlight the item you want filled with a pattern. Do that by clicking your object.
- Using the rotate button, I was able to get the pattern to turn in the direction I desired. YAY!
I think you’ll find that these options provide you with a lot of variety for your printed items. Need other Silhouette Software tips? Check out these posts.
Looking for a Silhouette Cameo? I bought mine from Expressions Vinyl.

Thanks, Joy. Love all the tips for using the Cameo.
Thank you, Trisha! 🙂
~Joy~
You’re so welcome Trisha! 🙂
~Joy~
All this info your giving is gonna be great when I get my Cameo! Only 2 more months til my Birthday…. and I’m totally gonna get one of these…. Reading and learning all this info is gonna make me look good when I take it out of the box for the first time! It’s such helpful info! Thanks Joy!
Theresa
You’re so welcome, Theresa! You’re really going to enjoy your Cameo, I just KNOW it!! 🙂
~Joy~
SO is it true that you can’t sell any items that are made with the silhouette images.
Hi Pam,
It depends on the artist. You can often buy a commercial license for the artwork and then you can resell works using the art, depending on the specifics of the license.
~Joy~
can you change the color of the pattern? I purchased a background, but realized it is red and beige chevron instead of red and white chevron. Can I change the colors? Thanks!
Hi Tiffany,
Sometimes you can change the color of the pattern if you can “ungroup” the lines. Right click the image to do that. You may also need to “release the compound path”. Right click the image to do that. After doing those things you might be able to see all the lines. (This may or may not work with the pattern you have.) This post will also help you learn how to change the colors and manipulate your image. Happy Crafting!