Create Double Sided Borders Using Silhouette Studio Software

This is a simple way for you to make a great looking double sided border without needing a paper punch. SWEET! If you have the Silhouette Studio software you’ve already got a single border you can use. YAY this costs NOTHING!! (Unless you don’t own a Silhouette and I just pushed you over the edge to buy one. In which case, I owe you one “I’m sorry” and one “You’re Welcome”. LOL!)

I’m using the Silhouette Studio Designer Edition software. You can use any border image, I just chose to use the scalloped one.
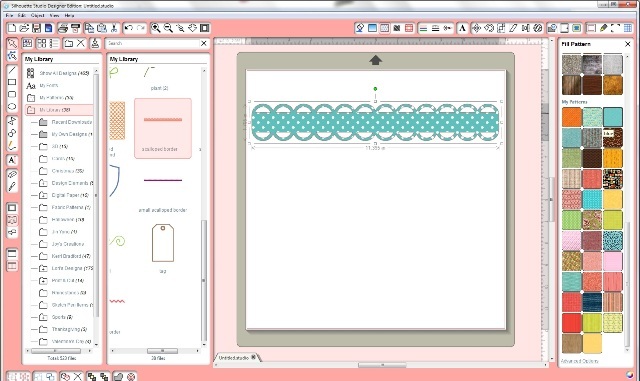
- Look under the “My Library” tab on the left to find the “scalloped border”.
- Double click the scalloped border to get it to your mat.
- Click on the “Replicate Window”. (The button <top right> that looks like a freaky butterfly.)
- With the scalloped border highlighted, click the “mirror below” button. TA DA! Now you have 2 of them.
- Highlight one of the borders and move it closer to the other one, until they overlap.
- Drag your cursor over both of the pieces until they are highlighted together.
- Right click and choose “Weld”.
YAY!! You now have a loopy/scall0ped double border!
If you want to know how to use color fills and adjust patterns in your
Silhouette software read this post.
Want to read about different kinds of punches? Check out this post.


I just can’t can’t wait to get me a Cameo!!! But for now, I wonder if this could be done on the Gypsy? Hmmm…might have to play with that later! 🙂
And if you want the border wider… just create a rectangle to go between them before you weld (think big enough to frame a picture or something)!
Dsuz,
A TERRIFIC suggestion!! I LOVE IT! Thank you for mentioning that. Can’t wait to add a rectangle. Whee!
~Joy~
LOVE it! Your kiling me here! 2 months seems soooo longggg away now! I LOVE learning all this stuff… but have nothing to play with! UGH! Well I guess I’ll use my Cricut for now anyway! 🙂
Theresa
Oh…. and a question for ya Joy! Does your Cameo have to be connected to your computer? Or does it have wireless capabilities???? Just need to know… for storing purposes…. you know…. like on my desk right next to me or in my other craft area for wireless access…. THANKS in ADVANCE! 😉
Theresa,
According to Silhouette, the Cameo can be controlled from a computer or an SD card. I haven’t tried the SD card function yet so I’m using mine all the time with the computer. So far it doesn’t work wirelessly with a computer. THAT would be AWESOME! I have mine on a desk next to me. 🙂
Your b’day will be here before you know it! 😉
~Joy~
I have a question as well….thinking about buying the Eclips or the the Cameo. Which one would you suggest? One that I can use svg cuts.
Hi Fixit.79!
I am really enjoying the Silhouette Cameo and I use .svg’s with it all the time. It does a GREAT job with them. I haven’t tried the Eclips before so I can’t really comment on that machine. I should find one to try!
~Joy~
Thanks for the info! I’m trying to weld a series of spider web images to create a border but when I click weld the inner portion deletes and I only have the outer lines as cut lines. Any suggestions on what to do? Thanks!
Bouthiquesheek,
I wonder if you could ungroup everything and then try welding it all? This tutorial might help too. I hope so!
~Joy~