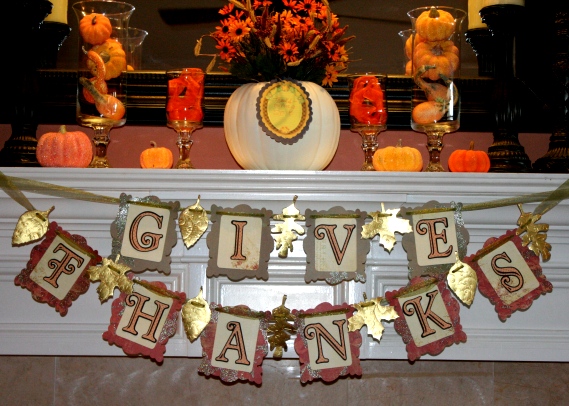
Woo hoo!! I’m loving the way this banner turned out. Remember when I turned that pumpkin into a vase? You can see that here. Here are some more pumpkin crafts: How to decoupage a craft pumpkin and here’s a Thanksgiving pumpkin decorated with vinyl. Ok, enough about pumpkins. 😉
Here’s how I made the Cricut Thanksgiving Banner
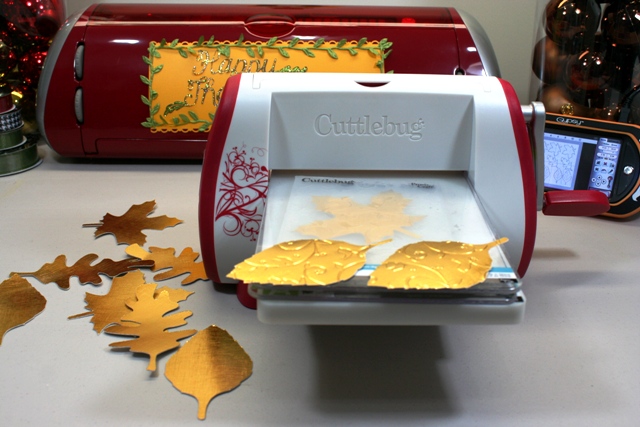
I used the 3Birds on Parade Cricut cartridge for all of the leaves. I cut them out using American Crafts foil cardstock. I love that stuff! It cuts out really well and adds to the look of a lot of things. I used my Gypsy to help me lay out as many leaves as I could on one sheet of cardstock. Next, I took the leaves and ran them through my Cuttlebug using the Birds & Swirls folder.
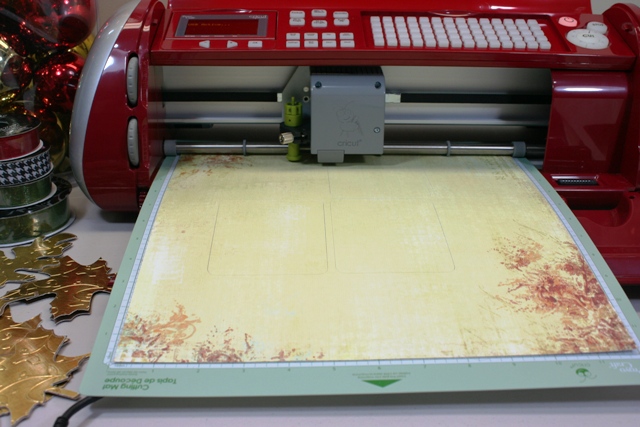
I used the Cursive 101 Cricut cartridge for this rounded edge rectangle. I thought it would make a great center for the lettering I had to apply. Next, I cut out frames from the Live Simply Cricut Lite cart.

Here I’ve gotten everything cut out and am beginning the assembly of each letter and frame. All lettering is from the Winter Woodland cartridge.
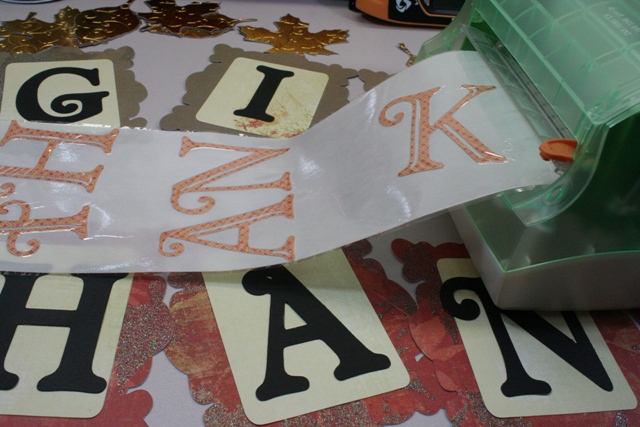
I decided to use my Xyron 510 Creative Station (here’s the newer model Xyron Creative Station) to quickly put adhesive on all the letters. I stuck down the shadow and then added the top lettering layer.
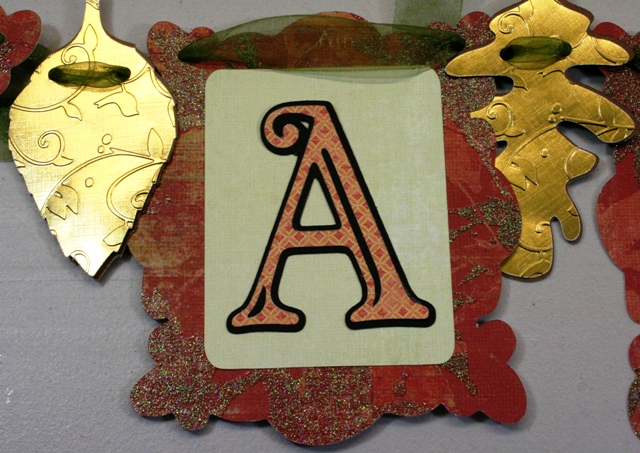
Almost done!! I love how well the foil cardstock embossed. Here you can see that I did make a bit of a shadowed backing for the leaves. I thought they might need a bit more stability plus the back of the foil cardstock was white…boring! Not that the brown I used is terribly exciting, but as you may know…um…I heart brown.
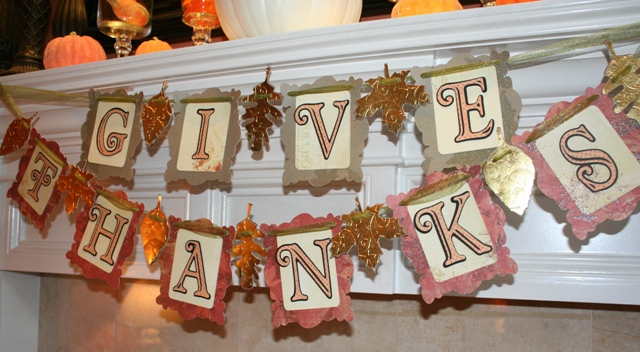
I used my Crop a Dile to punch holes in all of the pieces so I could thread the ribbon through everything.

Of course I love it! I love all your projects!
Holly
hollyshobbie at gmail dot com
I just love love this banner so beautiful, wow you did a awesome job thanks for sharing and a wonderful hope Debbie
[email protected]
Love the embossed foil cardstock…very nice!! That Winter Woodland font is a fave of mine. 🙂 TFS!
~Sharon C.
very pretty I love the colors you used. TFS
Tracy
NYGIRl1994 at yahoo don com
I LOVE this! I have never made a banner but may just have to after seeing this. I adore the embossed foil leaves! Tfs Miss Joy!
Cute banner. Love the foil leaves. You did a great job.
Chrissy
chrick88 at yahoo dot com
Hi Joy. Your banner is gorgeous! I love the double banner idea. The leaves are sooo pretty! Beautiful job and mantel! -Nicole
Beautiful banner!!!
Love the leafs in your banner. I’m gonna have to give that technique a try! TFS
stacy @ mycraftingtime dot com
Love the banner! now I’m going to have to get a cuttlebug to go with my cricut! soooo addicting!
I love the banner! There is so much to be thankful for! Thanks for sharing a great idea.
Your banner is gorgeous! I love the embossed foil leaves and the style of the letters.
Such a classy banner. So beautiful.
Lori
The Thanksgiving banner is wonderful. I never new there were full sheets of foil paper, now I’ll be looking for some! TFS
OH MY GOSH JOY!!!!!!!! this is super cute, I love it!!!!
Love the banner! Cute!!!!! TFS
I love you banner!! TFS!!
Oh, can i just say you rock? Love this banner!
[email protected]
This is so cute and just great. Thanks for sharing.
Kathryn
wamfamily at surewest dot net
wamfamily.blogspot.com
What a pretty banner…TFS; )
Oh, and I have to say I love how you decorated your Cricut for Thanksgiving – very cute!
Michelle
[email protected]
I love this banner. I am definitely going to make one. I am sure it will not turn out as pretty as yours, but I will give it my best. Thanks for all the GREAT inspiration.
Joy,
I love your pretty banner!!! 🙂 And that American Crafts foil cardstock really is to die for! It’s so different and it creates such a nice deep impression with the embossing.
Thank you so much for sharing and for the chance to win,
Jennifer
partridgelu at yahoo dot com
Really love this banner!
Unfortunantly, I don’t have a Mantle I could put it on, but I was thinking if I made it a bit smaller, It would look great on my front door.
You have such great ideas!
Beautiful banner. I just love the foil leaves it is a great idea. Thank you for sharing your idea with all of us.
hi Joy!! Love the project!! It is going to look lovley hung up for THanksgiving! I wanted to tell you I LOVE your matching bugs!
kacee
[email protected]
Hey Joy, I received my gifts, I love your puns and glue. Thank you! Thank you! Thank you! Not to mention, but it is so much more fun opening your packages than bills 🙂 Your banner is absolutely beautiful. I was wondering if you can tell me what is going on with the gypsy update. I sat on the phone for 45 min this morning. Time I do not have to waste, and then my bf who I joke around with and call you my new bf said, “well go ask your bf” so I laughed and said “that is a great idea” lol I have been trying to update my gypsy and I am not having any luck. Please help!!!!!!!
Joyfill,
YAY! I’m glad you got your winnings! You’re so welcome and congrats again. 🙂
IDK what is going on with the Gypsy update … sorry to say! I suggest trying again today. 😐 Maybe? Hmmm. When I did my update during the Beta, I had to try 3 times to get it to update. After each of my tries, I turned the Gypsy off completely and back on. Finally, it worked. IDK if it was some kind of Gypsy magic, luck or that it finally just worked. So, I’m thinking that your BF can retain her title since I can’t really fix this for you. LOL! Now you’re going to want to throw things at me as I suggest that you…um…call Cricut. 😛 Sorry! Tell your BF that your BF says, HI! LOL!
~Joy~
LOVE this banner! Gives me a great idea for making a Christmas one…NOEL. Although it’s going to be hard to resist the temptation to spell it backwards…..just to make people stop and think…..who’s LEON???? LOL!
This is beautiful!!! I am so scraplifting it! 🙂 Hope you don’t mind!
that banner is sooo cute! you did great joy!
Beautiful banner!!
I was just wonding how the cuttlebug worked. The banner is great.
Wow, guess I can’t spell today…..I was wondering how the cuttlebug worked.
I love the banner, especially the leaves, they look amazing. I have a feeling my husband might ban me from your blog if he ever finds out where I’m getting all of these ideas and product wish list items from. Now I want a Xyron. lol
Wow…as promised, I pretty much scraplifted this one! 🙂 Thank you!!!!
ttscraps.blogspot.com/givethanks
That’s a really cool idea. I don’t really have a lot of Thanksgiving decor, so this will really help out.
I just love the banner u made…It is really beautiful.
Mickey
Another awesome project!!! Thanks for sharing!!
vickie m
[email protected]
absolutely wonderful! now i must buy a cuttlebug!