Cricut Thanksgiving Cartridge Vinyl Craft Pumpkin
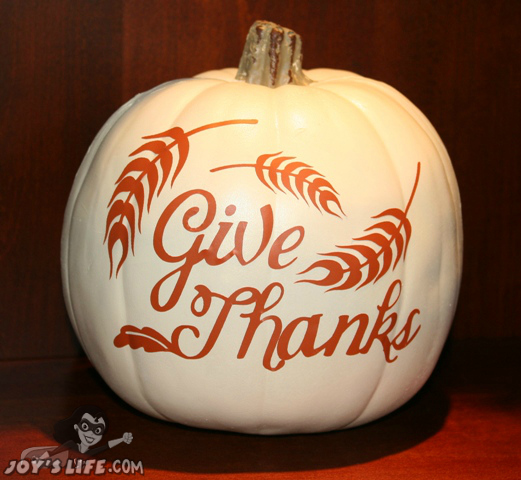
I noticed those bubbled areas AFTER the photo. They’re fixed now. 😉
You know how much I love these craft pumpkins, right? It’s ridiculous. I could start a big fake pumpkin patch around here. If I did, I wonder if Linus would bring his blanket and hang out? Linus and I could probably be good friends. I usually have a blanket nearby too. 😉 As I write this post, I’m covered by my Alabama blanket. Woo hoo … and Roll Tide! Ok, now we can talk about crafts.

Is this vinyl beautiful or what? Ohhh, I LOVE this color. It’s from Expressions Vinyl and I SUPER LOVE IT! Does it crack you up how I just let the vinyl roll right off of my 12×12 mat? Well, it doesn’t hurt anything and I didn’t want to measure anything or find my scissors limit myself.

I use the regular Cricut blade to cut vinyl. If you want to learn about using vinyl with your Cricut, check out my Cricut Vinylology DVD. It’s a 2 disc DVD with over 3 hours of instruction and projects.

Now the vinyl is almost finished being weeded.
I used the FLIP function on my Cricut Expression so I could have those little wheat stalks going in different directions. I also varied the sizes of them. I’ll tell you straight up that it is DIFFICULT to get the vinyl to stick to the pumpkin. I do show you how to deal with this in my DVD, but I’ll tell you that it’s about burnishing, a few other tricks and having patience. 😉 I used transfer tape on the lettering, but I put the wheat on by hand. I cut the sentiment at 3 1/2 “.

Yes, I got those bubbles out after this photo! 😉
I love the quick change that vinyl can make. Plus, if I want to peel this off and use the pumpkin some other way, it will come off without much trouble at all. Now, that’s true for this surface, but not all surfaces. Try sticking vinyl to paper sometime! That looks cool, but won’t come off. 😉
Need vinyl? I like to buy mine from Expressions Vinyl.

This is soooo pretty! Thanks so much for sharing!
Joy,got to get some orange vinyl and another pumpkin or more,great idea, joy
I really need to try vinyl…you have such great ideas. TFS!
So spooky!!! I love the silver! Very cool! Thank you!
Tammy
ttscraps.blogspot.com
The pumpkin is beautiful!
I love that vinyl color!! Great project too!
Now I must get one of these oumpkins and try the vinyl on it….TFS!!!!
That is a great looking pumpkin, i have not tried cutting vinyl yet. Looks like that is the next thing to learn
Happy to see another vinyl project…I think I am going to try to use it for some glass etching for a custom Christmas present for some loved ones! Thanks for the continued inspiration!
that’s a beautiful pumpkin! nice project!
I love the use of vinyl on the pumpkin- I never thought to do something like that! This has gotten my creative juices going now!
We’ve already had our Thanksgiving up here in Canada but I am going to do this for next year. It will make a great centerpiece that I can take to all three of our dinners. I get the pumpkins these year once they go on clearance.
Love your pumpkin! I really need to get some colored vinyl. I have been using black and the colored vinly looks cool!
I like this. I have so many ideas for next halloween that I might need to get started now. Thank you for all the ideas
great job.. never would think of doing this.. thanks for the inspiration..
Bubbles?? What bubbles???? Regardless, it’s cute!
I’m learning all kinds of cool things you can do with vinyl. That pumkin is so cute.
This pumpkins look great, the white ones have such a great effect.
Kim xXx
I love these craft pumpkins … especially since they’re not messy 🙂
I love this pumpkin! You did a great job!
spunkycrayon at yahoo dot com
Your pumpkin looks great, TFS
Great pumpkin Charlie Brown (aka Joy).
This is awesome! I keep seeing the craft pumpkins at Ms or HL and I can never imagine anything to do with them besides just let them sit there… but this is a fantastic idea!! I even had to show my husband and now he wants me to go get some today to try to decorate! LOL!
I love this!
I went to Wal-mart (1 hour away) and got me one of these pumpkins! I love this one and the tissue paper one, Now I need to get busy and make one or the other! LOL Thanks
Tammy
omg-oodness! i loved this so much i ran out and got pumpkins and did my own! love it!
I love the pumpkin. I will definitely have to try this. Thanks for making using vinyl look sooo easy.
Love this pumpkin – it is elegant. I will definitely have to ry vinyl. Kathy
what a good way to deco a pumpkin…..with bad wrists carving is too hard……so i gave up with the pumpkins…..now with vinyl i can once again do this…..thanks…..
God bless……
Your pumpkin is gorgeous. Are you using your cricut cake machine to do this? TFS
hugs,jen
jennyscards.blogspot.com
Hi Jennifer,
I have a red Cricut Expression. It looks like the Cake, but it’s not. 😉
Thank you! 🙂
~Joy~
Guess this is another “add on” to my wish list for Christmas. Hope Santa fills some of them. LOL Moving the dvd to the top of the list. Thanks for all you do.
I love the look that the vinyl gives to the faux pumpkins. I did one black and one white for Halloween last year.
I also bought your DVD. Lovin’ it. I know I’ll refer to it lots.
I love the pumpkin!! What color of vinyl did you use? Thanks
Hi Cathy!
Thank you! I love that color vinyl, don’t you? I just went and checked my vinyl swatches so I could be sure to tell you the right one. 😉 It’s persimmon. I like their orange color too. It’s a nice shade.
Have a great day!
~Joy~