
A few weeks ago I showed you how to print and cut stickers with the Silhouette Cameo. In that post, one of the stickers (the cat) I made used a photo that I imported. It’s cool to be able to import photos into the software to give a true one-of-a-kind look to your projects. Here’s a project where I was able to easily personalize a scrapbook layout by importing a photo into a ready made layout. You’ll come up with tons of ideas for this function of the Silhouette!
Here’s how to do it:
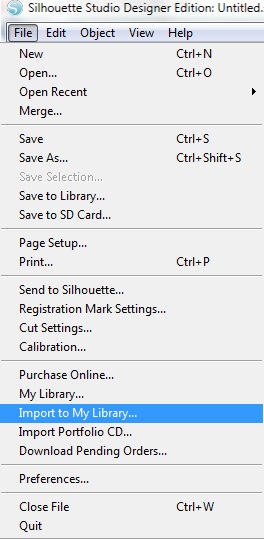
Step 1: Go to the File menu and choose “Import to My Library”.
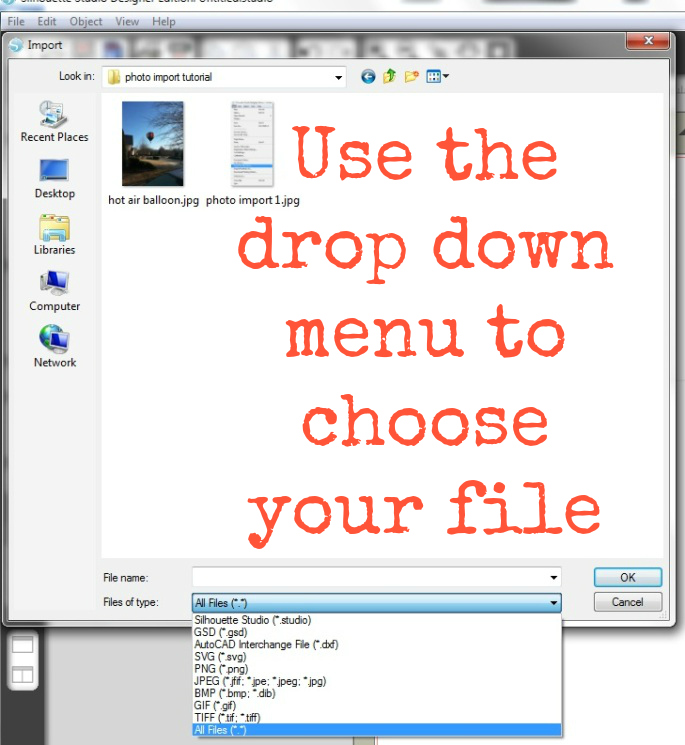
Step 2: Choose the file type you’re trying to import from the drop down menu. Sometimes it helps to choose “All Files” to be sure you see everything you have in that file.
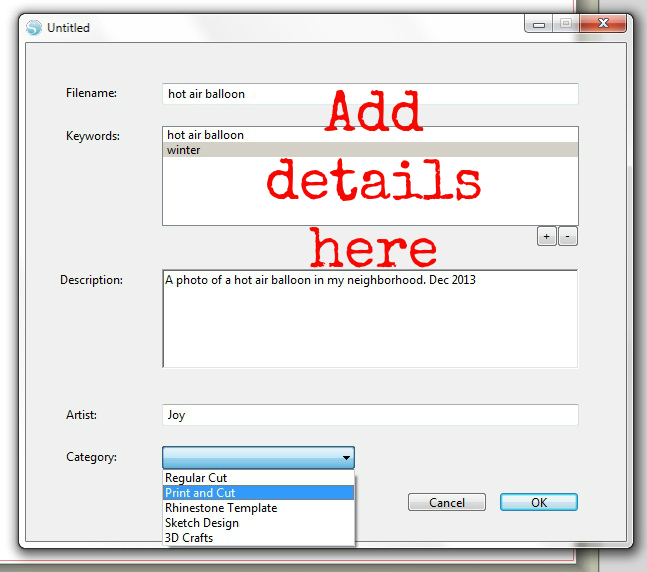
Step 3: When you’re importing your photo you can choose to add details about it. This is the same screen you see whenever you import something into the software. You don’t have to enter any information at all but it helps if you ever need to search for something.
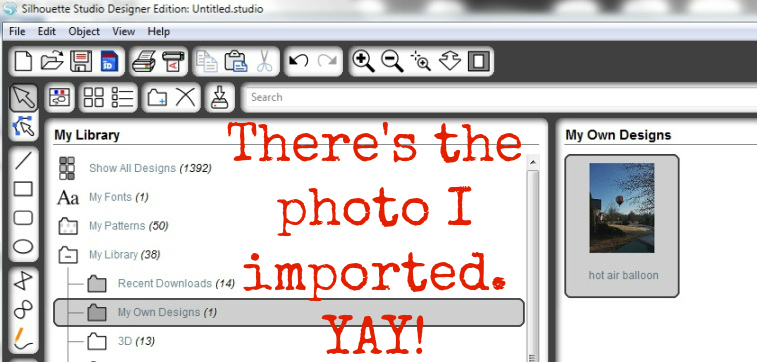
Step 4: After you enter the information about your photo and click “ok” your photo imports into the “My Library” file inside the “My Own Designs” folder. You can drag it into another file or leave it there. If you’d like to create a new file, just right click in the files area. For example, I created that “3D” folder that you see in the photo above. I like to label and categorize my files so I can find things easily.
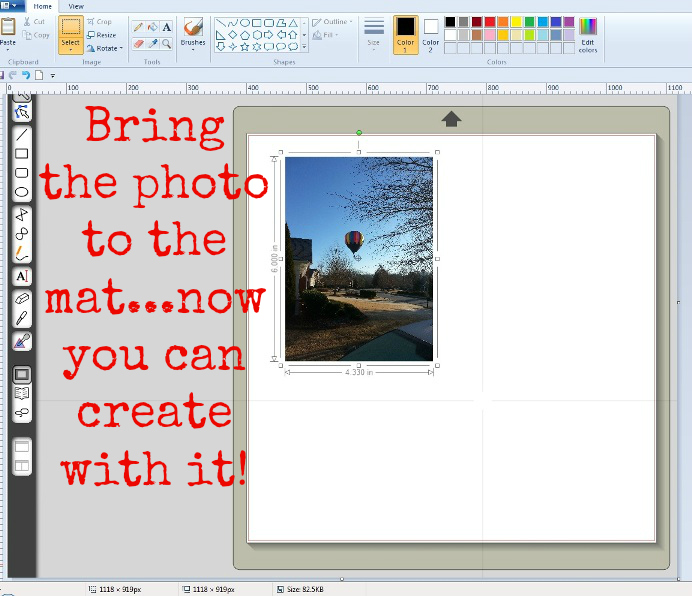
Step 5: Double click on the photo or drag it onto the mat, whatever works best for you. Now that it’s there you can create all kinds of things!
Here’s what I made:
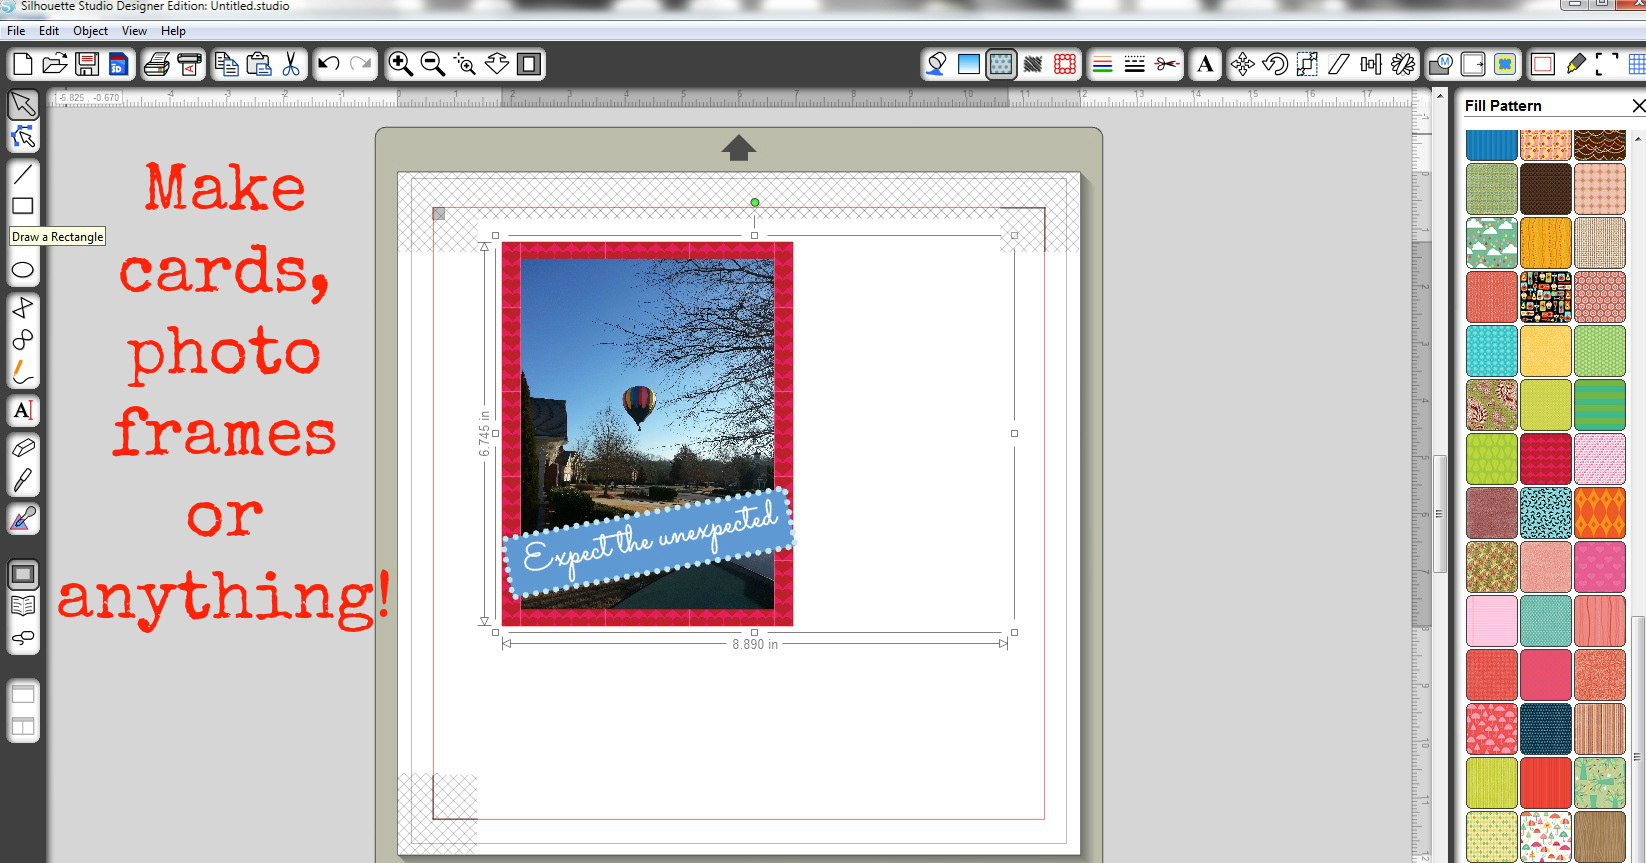
I used the rectangle tool from the left hand side of the screen to help me create a frame for my photo. I added another rectangle, filled it will color, adjusted the outline to have some light blue dots and added text. Adding registration marks makes it possible for me to print and cut this photo. Here’s how to print and cut using the Silhouette Cameo.

I love this photo because it was a pretty big surprise to me. I came out of my house one morning last month expecting well…the ordinary. I kept hearing this strange noise but I guess it took a while for the sound to register with my brain. It was a hot air balloon going by! It was so unexpected and wonderful. It made me super happy to see it!
I hope this tutorial helped you! If you need more help check out my FAQ’s page.
If you enjoy my site, I hope you’ll tell your crafty friends too! If you feel so inclined, like me on Facebook too! 🙂
Have a crafty day!


thanks for another great tutorial-I appreciate them so much
I’m so glad that helped, Barb! That’s such a fun feature. I’m planning on doing another scrapbook page and importing a photo like I did a few weeks ago. That was such a hit around my house! It makes me want to do another. It’s so much easier to do using that photo import feature.
Happy crafting!
~Joy~
I just received a Silhouette at Christmas and am so excited to have found your blog with all it’s great helps! Love the balloon picture. We used to live in NM and would see dozens at a time at certain times of the year. So fun to watch them!
Thank you, Mary! That balloon was so close to my house before it floated a little further away. It was a great surprise! I bet that was wonderful seeing dozens of them when you were in NM. How cool!
~Joy~
Joy you always have great tutorials! This is a wonderful one and will come in handy. I love my cameo!
Deb C
Bugjuiced
Hi Joy….thanks very much for the great Tutorials…I just wondered if you ever find that when you import a photo, when you double click the photo doesn’t appear on the drawing page? This happens to me often, and sometimes it will only appear in My Patterns, if I draw a shape, and then it will work. This was a happy accident actually because I found that if you fiddle around with the Advanced options and scale the photo you can get a tiled effect…which is quite cool. What do you think I’m doing wrong? I followed your instructions and the only think I did differently was to leave the photo in My Own Designs whereas you moved yours to a different folder..could this be where I’m going wrong do you think? Many Thanks and love your blog !
Hi Chris,
I do think you should try dragging your photo from wherever it imports to the virtual mat, instead of double clicking it. Have you tried that? I would still create a new folder just so you know where to find your photos. I hope that is some help. Let me know how it goes. 🙂
~Joy~
is there a way to save the card once it’s made so that you can upload it and print through a photo center – i’m thinking christmas cards. 🙂
Jenny,
I haven’t tried that so I’m not sure. That’s a great question. If I find out, I’ll let you know. 🙂
~Joy~
Oh thank heavens I found your tutorials on the Cameo. I just received mine in early June and OMG, I was about to A): pull my hair out because I have “eaten” the heck outta my mat ( thanks for the clarification of why this has happened) and B:) wondering when in the world I would ever really figure out how to do more than just “cut” an image….. Ay Yi Yi….
I used to have the Cricut original…. easy breezy….. minimal learning curve…. but this silhouette…..arrrrgghhh…
I have figured out the material blade and a few pen “hacks”…. but this whole “registration mark” and intricut cutting svg conversion stuff makes me want to drink…. heavily……. really…. lol.
Hi Meg!
I’m so glad the tutorials are helping you! 😉 I have to say, your comment cracked me up. Here’s a card that goes along with your last few words. I think you’ll appreciate it. Also, it’s “wine thirty” here. LOL! 😉
~Joy~
P.S. Let me know if you need help with the Cameo. 🙂 Happy crafting…I’ll toast to that! 😉