The Problem
I’ll keep this short and sweet. Are you having problems with your Silhouette Cameo cutting in a place different than you told it to? For example, I had my machine set to cut near the top of a 12×12 piece of cardstock, but you know where it cut? The edge of the mat. I learned a few things due to that. #1 – A blade setting of 5 plus doing a double cut will slice the edges of your mat if you cut there. #2 – The translucent part of the mat is much more durable than the transparent edges. Wait. I can prove it. I know I put that mat around here somewhere… Oh! Here it is!
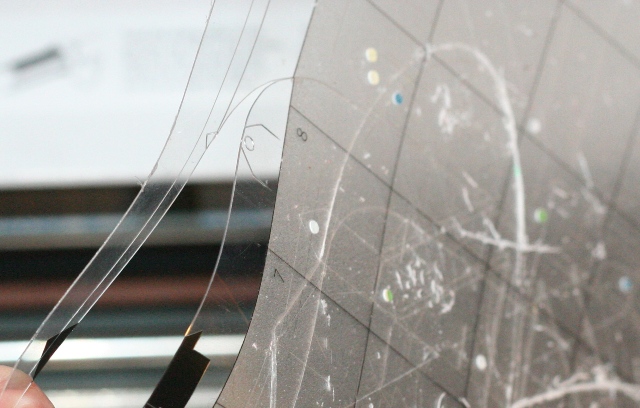
The Inside Scoop
So sad. Luckily, I anticipated that some mat related disaster might befall me and I bought two extra Silhouette mats a few weeks ago. It’s true that a few cuts off the main part of your mat won’t destroy it like this, unless you’re double cutting with a blade set to five (0r above), then you’ll have a nifty hanging area for your mat like I do!
The Backstory
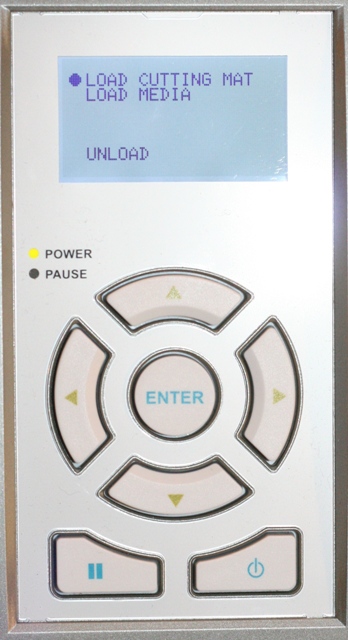
So, what happened? I’ll tell you. A few days ago I was cutting vinyl without using a mat, which the Cameo can do. To do that, I set the machine to “Load Media”. At that point, instead of loading the mat, I loaded vinyl. Later, when I went back to using the mat I left the settings on “Load Media”. I shouldn’t have. That made everything I cut start about an inch or two higher than the way I had it laid out on the screen.
The Solution
If this happens to you, use the keypad on the Cameo to move the dot next to “Load Media” back up to “Load Cutting Mat”. TA DA…then your problem is fixed!
I think this might be another post that I can file under, “Why am I so stupid?” Did you miss the last one? It was here. LOL!
Alright! Time to Go Get Crafty!


Wow, didn’t know the silhouette can cut like that. Thanks for the tip. I also learned that you didn’t need a mat for vinyl which I didn’t know about.
Liz
WOW… Poor, poor mat! LOL good thing you got extras! I didn’t realize the blade was sooo powerful….. Makes me want this tool even more…. I’m like Tim the Toolman Taylor (Tooltime)….. Gotta have MORE POWER!!!! GRRRRR! 🙂
I cut through the sticky part… But it’s ok. Just taped up the back of the mat with clear packing tape. Good as new!
Thank Goodness you posted this !! I have just been cutting through my mat and had no idea. I emailed the company, hunted for hours on line in hopes someone would have something about it. I even looked up repair shops thinking my new machine is broke. You are a Life Saver !!! Thanks
Wildvine321,
I’m so glad my post helped! I know I was going crazy until I figured it out. 😉
~Joy~
OMG thank you! Some how my machine got switched to “load media” and I couldn’t figure out why my Silhouette just started cutting crazy. I’m so glad you posted this because you saved me countless hours of trying to figure things out.
Mypaperpassion,
I’m so glad that helped! It was driving me crazy when I couldn’t figure that out. It’s such a simple thing that can go SOOO WRONG, isn’t it? LOL!
Happy crafting!
~Joy~
OMG, this has been happening to me for months! Since I couldn’t figure out the problem, I would manually move the blade to a certain point in the mat before cutting so it would stop cutting on the outside. I just came across your post while searching for cutting mats and I thought “could it really be that simple?”, I turned on my machine and sure enough, it was on load media. I changed it, loaded my mat and cut a test image and voila, it worked!!! I feel so stupid for not having figured that out before, but your post has been a mat-life-saver! THANK YOU SO MUCH!!!
Leinad,
I’m so glad this post helped you! We’re in the “feel so stupid” club together because that’s exactly how I felt after finally figuring it out. LOL! Hey, even if it takes us a while to get back on track, we eventually get there, right? LOL!
Happy creating!
~Joy~
Thank you so much for sharing this!
I was having the same problem! oops!!
Beijinho
Ana
Hi Ana,
You’re so welcome! I’m so glad it helped!
~Joy~
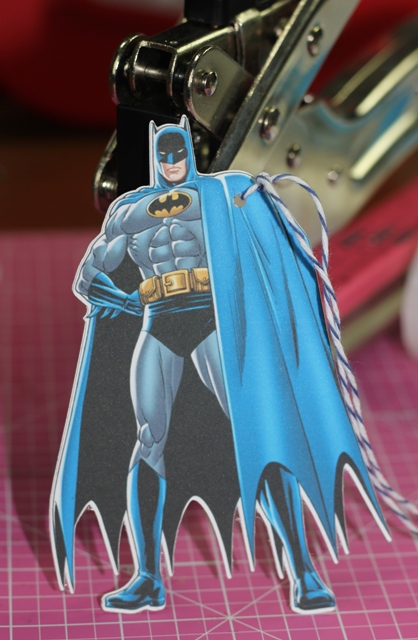
Joy – you just saved my life! Trying to do an Art Mom project for my son’s class – I need 22 of these boxes and could not understand why it would not cut on the paper. I now have a nifty hanging thing on my mat as well! Thanks so much!
YAY Marie! I’m so glad that helped! Now you have a special mat too! LOL! 😉
~Joy~
Duh! Do I feel dumb!
Thanks for enabling me to start the new year with hope after ending it this morning with an ultra frustrating session trying to cut a New Year card for my family that sliced up 5 sheets of card before I finally finally had to just print my A5 design down the middle of an A4 card!
cheers from sunny Singapore, Rogerstoryteller
I’m so glad it helped! 🙂
~Joy~
Thank you, thank you, thank you! Something so obvious that was right in front of my face 🙂
I was right there with you on that one! LOL! It’s seems obvious but it’s easy to overlook. I did! LOL! 😉
~Joy~
Thank You Thank You Thank You for posting this. I have been going crazy for 3 days moving all my designs down an inch wondering why my silhouette wasn’t working right. You saved my mat and my day!
Woo hoo, Sparkle Bows! I’m so glad that helped. That part of the machine should come with a warning! LOL!
~Joy~
Joy, You are a genius! I love you! lol
Awww, thanks, Nina!
~Joy~
You just made my day! I just got the Cameo and have been cutting my mat up and can’t figure out why! Thank you! I knew it was operator error.
PM
YAY Patty! I’m glad I could help! Congrats on your new Cameo!
~Joy~
I did this too and I contacted customer service thinking I had ruined my machine. I hadn’t done vinyl yet (I was still a newbie) and hadn’t ever used the ‘load vinyl,’ button. They told me how to fix it and I felt really silly! I still do this occasionally, but I’m glad there’s somebody else out there that has had the same issue! How awful to have it ruin your mat!
Lynette,
You’re soooo not alone! LOL!
~Joy~
Thank you SO MUCH !!!!! i have also been breaking my mat 🙁 can you believe that? Thanks Again:)
You’re welcome, Ivet! 🙂
~Joy~
My wife has had this problem a few times with her KNK Zing? Any ideas on this particular machine?
Thanks, Ken (Vinyl Couture)
Hi Ken,
The KNK Zing definitely has a learning curve. I’m always referring to the guide for it when I use it because I don’t use the KNK often enough to remember. Ack! I need to use it again because it IS a great machine! Here’s a link to the guide I use: KNK Zing Guide . I’m sorry I don’t have a quick answer for you. 😉
~Joy~
Wow, thanks so much!! I’ve been so frustrated!
Hi Victoria,
I’m so glad that helped you! So long frustration! 😉
~Joy~
Hi Joy,
I have never logged into a site like this before but just had to login to thank you for the info you have shared. I am new to the Cameo and have already had two major problems resolved through your postings. The first problem was setting cut lines on an svg image and then the Cameo not cutting where I thought it should. Wow, you rock!
Thanks,
Jeanette
Hi Jeanette,
You made my day! Thank you so much for letting me know that those posts helped you! It’s no fun when you sit down to create and something prohibits that crafty pursuit. I’m glad these posts helped you get your craft back on! YAY!
Have a crafty day,
~Joy~
Thanks so much – you just saved me!!! I could not figure out what I was doing wrong!!!
bohoo i just learned the same bad way: I cutted my brand new mat. Love your blog.
Awww, I’m sorry you cut your mat too!
Joy – you just saved my life!!!!!
ihave been wondering why this was happening to me!!!
Thank u so much!!!
I have one question, how many month does your mate last? Mine is now, not sticky any more!
Hi Cecilia,
I’m so glad that helped you! I’ve found that it just depends on the material and amount of usage a mat gets before it becomes “not sticky”. I wish there was a standard amount of time or an expiration date so we’d be able to know specifically but it really does vary. You might try EZ Dots Repositionable Adhesive or Stick and Spray to restick your mats. I use both of those. I prefer the EZ Dots simply because it’s not an aerosol. I hope that helps!
~Joy~
Thank you so much for this post! I just got a Cameo, and really know nothing, I’m just figuring it out as I go. I have been cutting vinyl without a mat. I just cut some paper, and fortunately, it was a print and cut, so when it didn’t recognize the registration marks, I just did it manually. But I noticed that when I did the ‘test’ cut it was right up at the corner of the mat – not in the cutting area. I thought something was wrong with my machine! Thank you so much for explaining that I still had it set for ‘media’ and not mat. The Cameo is such a neat machine, I’m overwhelmed with choices of things to do with it LOL
Liz,
I’m so glad this helped you. Congratulations on your new Cameo!
~Joy~
THANK YOU!!!!! You are truly brilliant!
HA!!!! How did I miss that??? I have been pulling my hair out for an hour now. I googled the problem and wouldn’t you know, it brought me back to you, Joy. I visit your blog all the time but missed this post back when. We all have these head scratching moments. Thanks for the quick fix.
Thank you! I thought I would never get it right.
OMG thank you!! I cut without the mat today and must not have switched back to “load mat” because this was happening to me. Luckily your post came up #1 so I didn’t have to do a lot of digging 🙂 I taped the back of the mat but I think I need a new one anyway because now it’s ALL cut up and not sticky anymore (even though I just cleaned it with baby wipes). Thanks again.
Thank you x100! My 2 year old likes to push the buttons and must have changed the setting. They really need to have this little tidbit on the Silhouette website!
Thanks so much! Mine has been cutting just fine but haven’t used it since last weekend & then today it was doing just that!! I must have hit the arrow down button on accident. Glad I found your blog…….think I’ll have to check out some other posts 🙂
omgosh..i have never even used that I must have accidentally pushed is somehow…you are a life saver as I have Christmas gifts to finish with this machine!!
Thank you so very much!! Just learning to use my Silhouette and was having this exact problem!! Googled it and found your answer!! So simple:) Thank you again so much for passing on what you learned the hard way!!
Thank you for this! Saved my bacon!
I’m so glad I’m not the only one who did this – although I feel rather stupid that I had to go search the internet to find out how to fix the problem!! Thanks! 🙂
thank you thank you thank you thank you thank you thank you thank you thank you …………….
You’re welcome, Tolu71!
Yours was one of the first to come up when I searched for this problem. I thought I might need to recalibrate my cameo. Imagine the loud Duh! when I realized how easy the fix is! Thanks for sharing – this was easy to overlook.,
So happy that it helped you, Jackie! 🙂
you saved my life! thank you!
i was kinda freaking out and then i found your post. such a simple instruction, yet so invaluable! thank you thank you!
Thank you! Thank You! Thank You!
I sooooo needed this, I was ready to throw this thing out the window!
THANK YOU, THANK YOU SO MUCH FOR THIS SIMPLE EXPLANATION TO MY PROBLEM I BEEN DEALING WITH THIS FOR SO LONG AND I COULDN’T FIGURE IT OUT, IT WAS GETTING ON MY NERVES TO HAVE TO BE MOVING THE IMAGE DOWN . THIS KIND OF THINGS DO MAKE YOU FEEL STUPID!!!! LOL. ANYWAY THANKS FOR THE HELP!!!!!
YAY! Thanks so much for letting me know that it helped! Woo hoo!
I’m so glad I found this even years later! I couldn’t figure out what I was doing wrong!!
Please note that my email address is all low case….
My silhouettte cameo is making my mats dance all over the place…
The roller set ups are where they are suppose to be…How can I fix this
problem…
Thanks,
Cindy Branchaud
Hi Cindy,
Since the rollers are in the right place, I’m not sure. That’s a new one on me! 😉 You might try contacting Silhouette. Here’s a link to their contact page. Sorry I couldn’t be of more help.
For Silhouette Portrait users…this will happen if you load using the second button from the top (which is for use when you are not using a mat) instead of the top button.
Thank you, thank you! I never would have thought to check that. I had not switched media, but evidently bumped that button at some point.
Hi Heather!
You’re so welcome! Glad I could help! 😉
Thanks a ton!!! Idk how that setting was ever switched. Luckily my mat was not cut all the way through. But I’m definitely thinking I need to pick up a couple extra mats myself. Thanks again!!!
YAY! Glad it helped Ashley! 🙂
Thanks! I was getting so frustrated.
OMG! Thank You Thank You! I have been going crazy for days trying to figure this out – You solved it!
THANK YOU! THANK YOU! THANK YOU!
I just came across some of your pins and when I saw this mat, I immediately knew that you would be able to fix my problem. I don’t remember setting my Cameo to the load media setting, but I was so frustrated because I had to put my pattern toward the middle of the mat and hope that the whole thing would cut. I haven’t tried to use it yet, but load media was checked, so I am sure that is why I was having this problem. My original mat was so cut up and I finally (after using packaging tape to hold it together), cut off the really bad sides and will use it for smaller paper. Thanks so much for your advice!