Sweet Treats Cricut Cartridge – Layers, Blackout & More

A friend was having trouble with the Sweet Treats cartridge and also needed some general pointers about layers and sizes. I hope this helps you too!
Ok, let’s get started! 1st let me show you what we’re working toward. Also, please forgive the ink stained blue ice cream. Um…I didn’t realize that I got some ink on my fingers. I know it looks gross and I’m sorry. 😛 Additionally, “Regular Button” means main button on the keypad, in this case the 3 scoop cone on page 35.
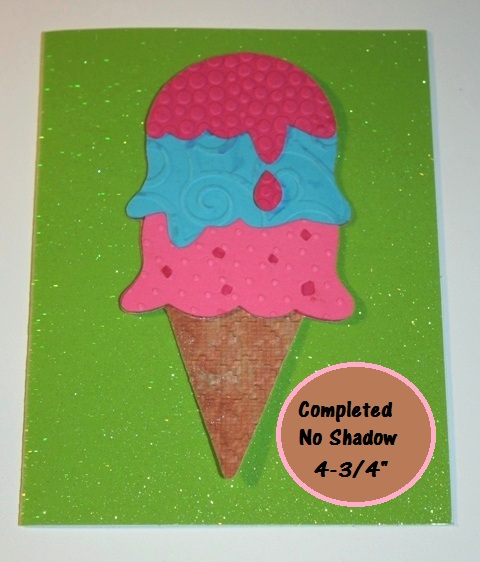
This is the completed ice cream cone shown on the top left hand corner of page 35 in the Sweet Treats booklet. What I’m also showing you here is that if you set your Cricut at 4- 3/4″ (that’s four and three quarters inches) this is how your completed ice cream cone will look on a standard A2 card (which is 4 1/4″ x 5 1/2″) . An A2 card is important because that is the size of a standard envelope. Of course, you can make your project any size you want, but if you want easy shipping and less postage expense, you might want to stick to standard sizes. This card will fit into a regular envelope like you buy at any business supply store.
**To Make a Card from 8 1/2 x 11 cardstock just cut the paper in half through the middle of the 11″ side for a standard folding card. Then fold in half. 😉
BEGIN!!
First, I like to cut the base. Which leads us into a question, right? What do we use for the base cut?!!
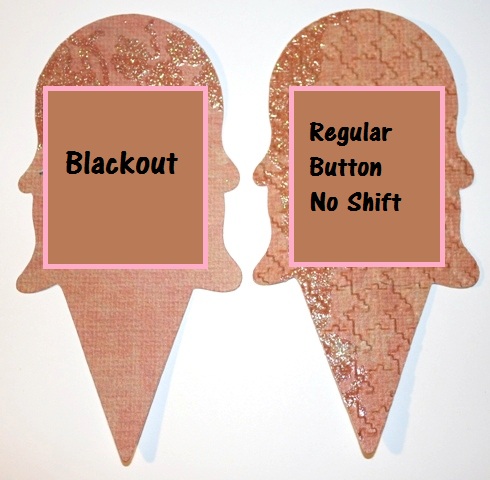
To perform any cut in this tutorial, you must first have the triple scoop button selected! (Even if I forget to mention it. 😉 )
The 2 cuts above look just alike, don’t they? Well, they pretty much are. They are the exact same size. I didn’t change the size button on the Cricut, I’m still cutting at 4-3/4″, but the difference between these is that the cut on the left (Blackout) has no markings for positioning the ice cream scoops.
The cut on the right (Regular Button No Shift) has little cut marks in it. They help us line things up. (Trust me on this, I know the text box above covers them, but they’re there.) When you look at the booklet page, this cut is the whole cone with the scoops on the left hand side at the bottom. It is <Icecrm6>.
So, What’s Blackout for?
If you wanted to make an ice cream shaped tag to write on, you would want to use (Blackout) so you could write on it. In cartridges like Every Day Paper Dolls you would use Blackout to stamp a face on the doll, for example. You wouldn’t have a very nice finished product if you stamped over the (Regular Button No Shift) base with all the little “line up” cuts on it. All in all, you can use either one for your base.
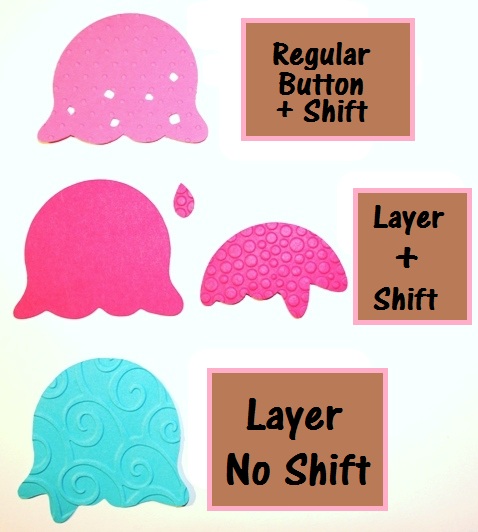
Don’t forget, to perform any cut in this tutorial, you must first have the triple scoop button (pg. 35) selected!
Alrighty!! Are you ready for some layers? I hope so. The photo above really explains how all this works, but we’ll go over it again. 😀 I stayed with the same colors as the ones in the booklet. I hope that helps you.
The light pink scoop of ice cream at the top of the photo above is created by pressing the (regular 3 scoop button) and the (shift) button. You still leave your size settings like we’ve had them at 4-3/4″. Ok, press cut and you’ve got a little scoop of ice cream with holes in it. Let’s put something behind those holes so they look like sprinkles, ok?
The 2 hot pink ice cream scoops that are next to each other in the middle of the photo above are formed by pressing the (Layers) button the (regular 3 scoop button) and (Shift). The largest of these 2 scoops will be underneath the “sprinkles” scoop that you cut in the last step. Cool huh? Oh no, an ice cream pun. 😐 The smaller of these 2 scoops and the little drip (LOL) go on the top of your cone to form the 3rd scoop. Yum! Let’s hurry…our ice cream is melting!
The blue scoop of ice cream is formed using the (regular 3 scoop button) and the (Layers) button. Press cut and you’ve got that cute middle scoop!
Now, all you need to do is assemble your scoops onto your cone. Don’t forget the little drip! 😛
But Wait! There’s More…
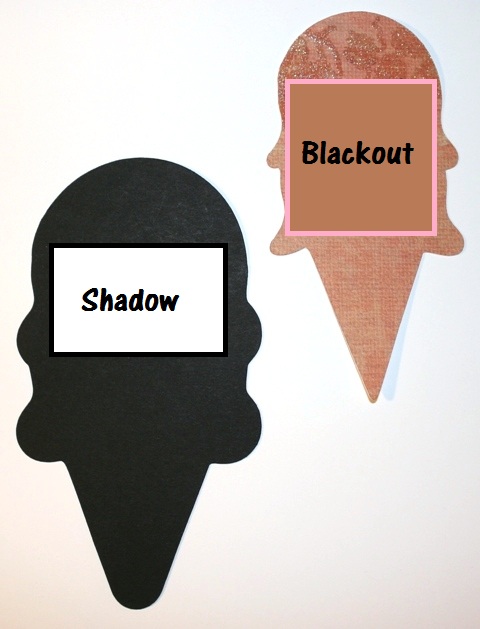
You could add a shadow to your ice cream cone. In the booklet, Shadow and Blackout are in the same block together, but don’t get confused. You know what Blackout does already, right?! Yes!! You’re so smart! You learned that further up in this post. I’m so proud of you. 😀 You remembered that blackout is the same size as the whole cone you just finished assembling. You don’t need to put the Blackout on the back of your finished cone, do you? Of course not! You’re good, you are!!
Here’s What the Shadow Does…
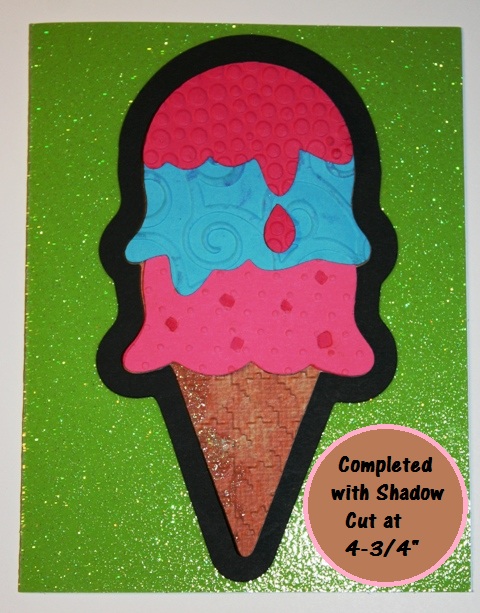
The Shadow outlines things!
If you want a shadow, you go right on and have one. You’ll press the (regular 3 scoop cone button) and the (Shadow/Blackout) button, then cut. This photo shows you how much space the shadowed ice cream cone would take up on a standard A2 sized (4 1/4″ x 5 1/2″) card.
BTW, if you want a cartridge that deals with shadows a bunch, check out Hello Kitty Greetings. Most of its cuts look better with shadows.
You know what? You’re all done!! I’m so proud of you! I KNEW you could do it!
If you need help with something, don’t hesitate to ask. If you join me on Facebook (just friend “Joy Joyslife”) it’s sometimes faster to get a response from me. What’s great about that too is that sometimes someone else has the answer if I’m away. I heart my Facebook Friends! Also, if I get enough of the same questions from people, I’ll usually write a post or tutorial about it. I hope you enjoyed this tutorial!! 😀
P.S. I used Cuttlebug folder Swiss Dots for the bottom scoop, D’vine Swirl for the blue scoop, Tiny Bubbles for the top scoop and Houndstooth for the cone. 😉


sooo I wish I had money to buy all these cool cartridges! They look like sooooo much fun!!!!
I just got this cart and haven’t got to play with it yet..boo. this looks so yummy..I can’t wait to play!
I just bought this and was hoping to see some card ideas.
Thanks for the info
Joy, You’ve NO idea how much I appreciate your explanation AND pics!! I’m a visual person, but I gotta have details too:) Thanks you, thank you, thank you!!
jillo
Thank you so much for clearing that up for me. I didn’t really understand when to use blackout vs. shadow. I appreciate the tutorial. Keep up the good work!
LOVE your tutorial and you!! 😀 That ice cream looks pretty yummy
thanks I needed that it is