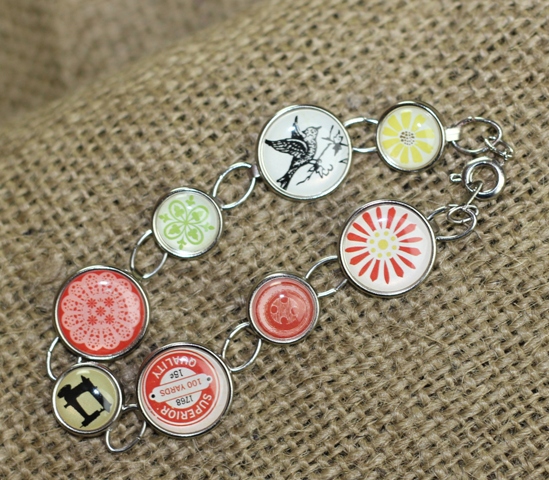
Learn how to make a DIY bracelet from decorative brads! This simple upcycle project transforms paper-crafting brads into a stylish bracelet that you can wear and enjoy every day.
Why Turn Decorative Brads into Jewelry?
These brads are too pretty to use on paper alone! I recently received this pretty set of brads from Lori Whitlock’s For The Record 2 paper line. When I got them, I thought they were too pretty to use. Actually, I almost always think her brads are too pretty to use. So you know what I do? I hang them on this and periodically look at them. I loved them so much that I didn’t want to “waste” them on a single project. Then it hit me — why not turn them into a custom bracelet so I can enjoy them all the time?
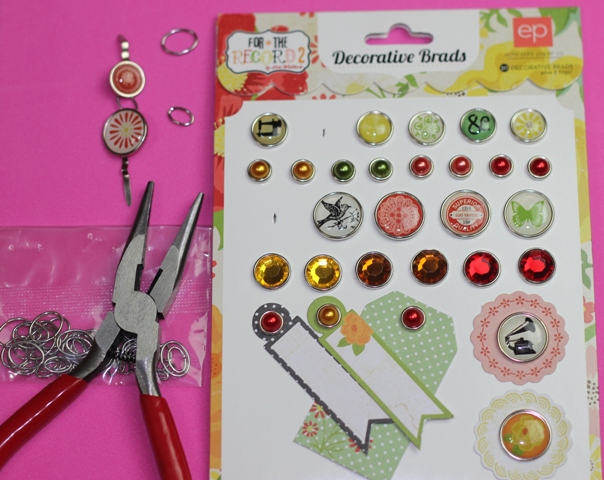
Supplies You’ll Need
To make this DIY bracelet from brads, you’ll need:
- Decorative brads (I used For The Record 2 brads)
- Needle nose pliers
- Oval jump rings
- A spring clasp or another closure piece to hold your bracelet on your arm
Step-by-Step: How to Make a Bracelet from Decorative Brads

1. Plan Your Design
Lay out your brads in the order you want. I alternated between the bigger and smaller brads. This lets you adjust the size by adding or removing brads or jump rings – to make it fit your arm just right!
What’s nice about making your own bracelet is being able to lay out the design like you want it!

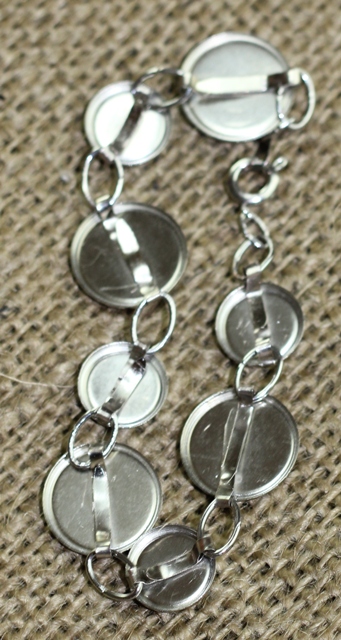
2. Open the Brads
Carefully open the split backs of each brad so they can be attached to jump rings.

3. Shape the Prongs
Using pliers, bend and flatten the brad prongs. You can try using your fingernails, but pliers make the job much easier—and you’ll definitely want them handy for the next step.

4. Connect with Jump Rings
Attach the brads to each other with oval jump rings, laying the prongs within the backs of the brads. Adjust the spacing or number of rings as needed to create a comfortable fit.
5. Add a Closure
Finally, add a few oval jump rings and a spring clasp to close the bracelet. Use pliers to open and close the jump rings, attaching them securely to the brads and clasp.
6. Wear and Enjoy!
Your handmade bracelet is ready to wear! I love how mine turned out! It’s a fun way to showcase decorative brads in a unique jewelry piece.

The Finished Bracelet
YAY! All done! Now I can have my beautiful brads and wear them too!
It might sound a little silly to make a bracelet out of decorative brads, but hear me out—this is such a fun and budget-friendly way to create a piece of jewelry! Plus, it’s a great excuse to finally use those pretty craft supplies that have been sitting around forever.
In my case, I had so many gorgeous brads from my time on the Lori Whitlock design team, and honestly? They were just sitting there, looking pretty but not being used. Every time I saw them, I thought, “They’re too pretty for paper projects!” So why not turn them into something I can wear and enjoy every single day?
That’s the beauty of this project—you can make something unique and meaningful without spending much at all. And if you have extra brads, this is a quick, thoughtful gift idea too.
A Little Reflection
The first time I wore this bracelet, I couldn’t stop smiling. It felt good to finally give those brads a purpose and to wear something I made with my own hands. Every time I look at it, I’m reminded that creativity doesn’t have to be expensive or complicated. Sometimes, the prettiest projects come from the supplies you already have!
I love to reuse and upcycyle things! Check out these other repurposed items!


Joy this is so amazing. Thank you for the idea. 🙂
Thank you so much! <3
Super Hugs,
~Joy~
Cute bracelet. What a great idea, and so simple, too!
So cute! And easy! Thank you so much for the great idea. I could also see using solid color brads to make simple colored bracelets. I’ve gotta do this!
Super cute, JOY!! What a fabulous idea! I just might have to make a bracelet out of my brads now : ) YOU ROCK!!
Awww, THANK YOU, Lori!! 🙂 You SHOULD wear your awesome work! 😉
~Joy~
How fun!! We spend so much time finding things to use for scrapbook embellishments…
Brilliant! Thanks for the great idea!
Joy, I just saw this bracelet and I LOVE it! What a great idea – maybe I will stop collecting and will USE Some of these scrap products one way or another. Question …I have subscribed to you forever and I used to get the email updates when you post. Now I Do not and If I miss you posting something on Facebook I often miss your projects and postings. Is there any way to get back on the blogs’ good side and be able to receive your emails again? I’ve signed up several times…guess I’ll start with that again! Thanks Joy!
Joy – OMgosh that bracelet is so stinkin cute!!! How creative and simple. Thanks for sharing and keep them coming.
Thank you!
This is genius! I also have a stash of beautiful brads waiting for “just the right project” (which means I am hoarding them until they go completely out of fashion). But as of today, I have a beautiful bracelet made with MME Sweetest Thing brads. Thanks for the great idea! I can’t wait to show it to my crafty friends.
This is a wonderful idea!!!! Thank you so much for posting the directions on your blog. I have some brads that I just can’t bear to part with, and you’ve given me a way to use them and still have them for me to enjoy. Thanks!!!
Thank you, Roberta! I’m so happy that you like it. I am so glad to be able to look at these special brads instead of loosing them or having them in a drawer somewhere (or giving them away since I loved them too much!). You might like this decorative brad idea too!
~Joy~