
This card was time consuming, but fun!
Ok, this card came about because I wanted to use some different techniques. I just did my “tests” using Halloween themed things. That way, if my tests even remotely worked out I’d have a good chance of being able to use the things together! Then…a card was born. 😀
I’m taking a deep breath while I figure out how to begin telling you all the stuff I did…
<deep breath> … and release… Ok, I’m better…now to begin…
What I Used:
- Punch – Martha Stewart Spiderweb Corner Punch, Ek Success PSPNP11 1-1/4-Inch Paper Shapers Circle Nesting Punch
- Cuttlebug Embossing Folder – Boo to You, Spiderweb
Here’s how I Made this Card:
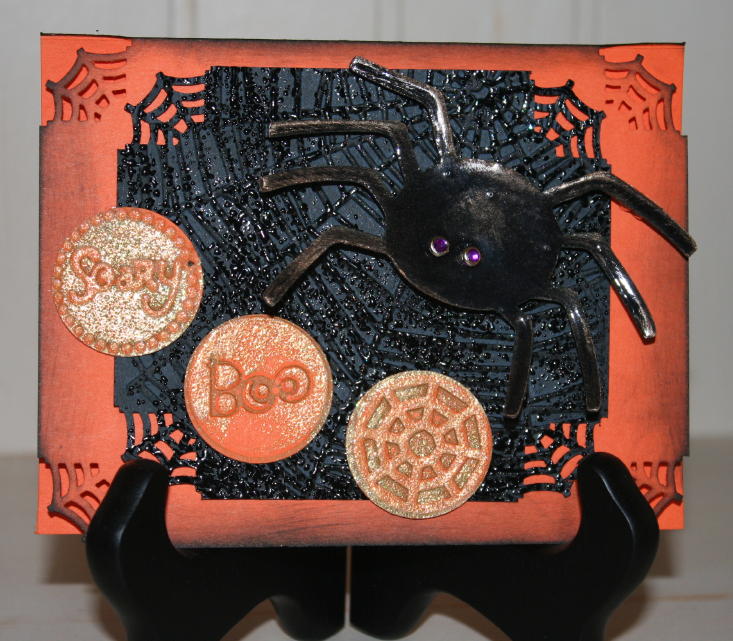
- I punched the corners of the orange paper with the MS spiderweb punch. I don’t really like that I left the back of the card square, but I wanted to show you that you can punch the top corners by themselves. Tomorrow, I will list all the info you need to use those Martha Punch Around the Page punches.
- I inked around the edges of the orange paper with the little Colorbox brush pad. It’s tiny.
- I ran that black paper through my Sizzix Big Shot using the Cuttlebug Spiderweb folder.
- I rubbed an embossing stamp pad over the Spiderweb and poured on some Ultra Thick Embossing Enamel.
- I heated the enamel with my heat tool (seen in yesterday’s post), that’s how I got that cool wet look on the web! SWEET!
- Next, I made the Spider! He’s a cut from the Cricut Doodlecharms Cartridge pg. 121.
- I inked the Spider with Bronze ink. Then I covered it with Diamond Glaze (’cause I love that stuff).
- After the Spider dried, I inked it again with the Bronze ink.
- I added the little purple brads as eyeballs to the spider.
- I made the circles yesterday. Here’s how.
- I had a good ole time attaching everything. I attached the spiderweb in black with my ATG gun, the Spider with a square pop (dot?…a pop square?) and the circles with my new Elmer’s Glue Permanent Sticky Dot Stamper.
I think I’m trying too hard with that Elmer’s Dot Stamper. I can’t seem to figure out exactly how to line it up to place the dots. I feel pretty silly about that since it’s probably waaay simple.
Well, that’s it! I think it took me as long to tell you how I made the card as it took me to actually make it! 😀 I hope you like it. It’s sitting above my desk now, just waiting for a new home.
Go Make Something SCARY!!

I love this card . I don’t have the cuttlebug but may think about getting one since there is so much you can do with it. I make a lot of cards now.