Want to make Halloween pillowcases with heat transfer vinyl? Cut your design with a Cricut or Silhouette, mirror it, weed it, and iron it onto a plain pillowcase for instant spooky decor.

Chic and Spooky Pillowcase Project
These Halloween pillowcases started with a bargain find, plain $5 cases from Walmart. With a little heat transfer vinyl and my Cricut, they became spooky accents perfect for the season!
My two boys stepped up to help me fulfill my challenge. They picked out the designs they wanted from the Chic & Scary Cricut cartridge and the Simply Scarecrow cartridge, but you can recreate the look with any Halloween SVG files.

Supplies You’ll Need
- Plain pillowcases (light colors work best)
- Heat transfer vinyl (HTV)
- Cutting machine (Cricut, Silhouette, or similar)
- Scissors and a weeding tool
- Iron or heat press
- Teflon sheet or pressing cloth
Want to make your own pillowcase instead of buying? My Simple Envelope Pillowcase Tutorial is a quick beginner project.
Step-by-Step Instructions
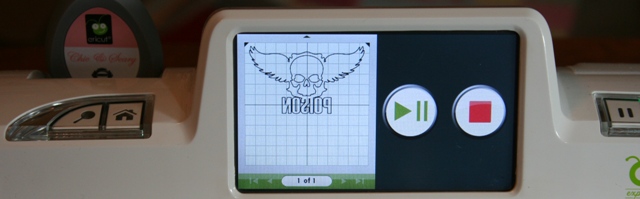
1. Cut the Design
Choose a Halloween image: skeletons, crows, scarecrows, or spooky words. IMPORTANT: Mirror (flip) your design before cutting so it irons on correctly, especially for text or everything you cut will be backwards.
2. Weed the Vinyl
Remove the extra vinyl and keep only your design on the clear carrier sheet.
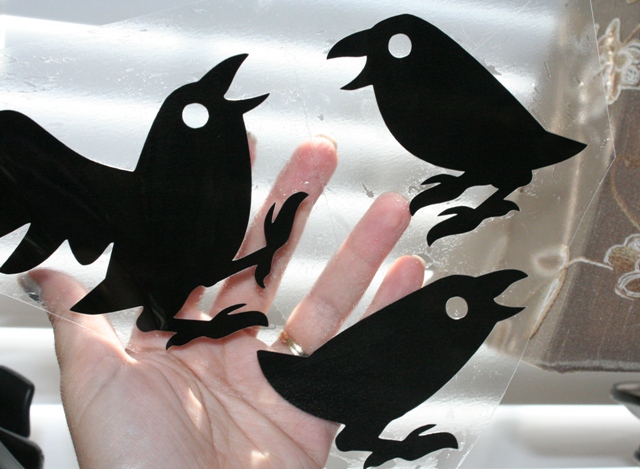
This is heat transfer vinyl after it has been weeded. You see that it still has the backing on it. These birds are from Cricut’s Simply Scarecrow cartridge (back when they used cartridges).
If you’re new to HTV, there are lots of finishes beyond standard black and white. Siser has a helpful guide to the different types of heat transfer vinyl that shows options like glitter, metallic, stretch, and more.
3. Press the Design
Position the vinyl on the pillowcase, cover with a Teflon sheet (or thin fabric, you can use a piece of material like another pillowcase or thin towel), and press firmly with an iron or heat press until the design bonds to the fabric.

4. Peel and Finish
Depending on the type of vinyl, peel hot or cool. Once the carrier sheet is removed, your design is set.
5. Optional: Layer the Vinyl
Want extra detail? Layer different vinyl colors. Press one layer at a time, making sure to protect the design with your pressing cloth.

I use those Tim Holtz Scissors all the time! Here I’m layering some vinyl. I’m not taking a ton of time with it. I’m just clipping some yellow pieces off of that other heat transfer vinyl, ironing it down and then layering the other piece. These 2 vinyls are not the same kinds of heat transfer. One can only be peeled cool, the other cool or hot.

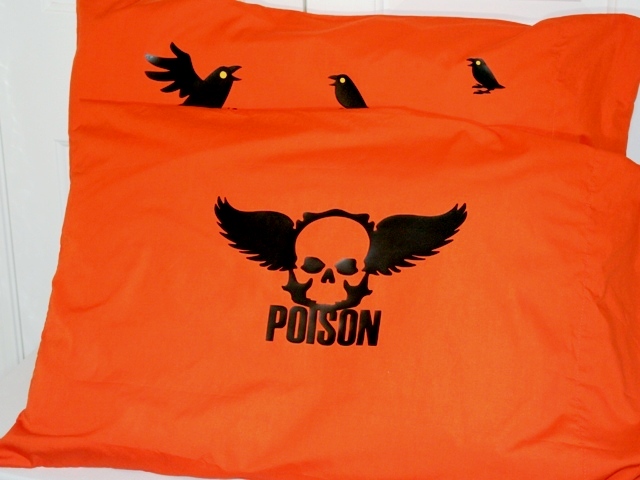
Finished Pillowcases
The skeleton turned out bold and graphic, while the crow pillow looks like it flew straight out of a Hitchcock movie. Layering pieces gave the scarecrow design added depth, and the boys had fun seeing their design ideas come to life.
These Halloween pillowcases with heat transfer vinyl are still some of my favorite seasonal accents. Proof that a plain pillow and a little creativity can go a long way.

Ca-Caw! Isn’t this one kind of creepy? My son wanted multiples of crows. Good idea! I think it looks awesome!
More Pillow & Halloween Projects
- Simple Envelope Pillowcase Tutorial – Learn the easiest way to sew your own pillowcases from scratch.
- How Much Fabric for Pillowcases – A quick guide to measuring and cutting the right amount of fabric for the perfect fit for your pillow insert.
- Easy Halloween Party Ideas + Free Monster Face SVG – Quick decorating tips plus a free cut file for spooky drink cups and party fun.
- DIY Chair Makeover – See how a chair and pillow got new life with fabric and a little DIY love.
- DIY Pokemon Team Rocket Costume – Another fun vinyl project, this time turning a plain shirt into a quick cosplay.


These are awesome, I think the boys picked good on these. Love the skull! I think skeletons would be awesome to.
angel hugs
Debby
Another wonderful project Joy! You never cease to amaze me!
Very Cool Joy! I got some vinyl transfer and have yet to use it! I know… I know… What’s wrong with me?
I own your DVD and watched it a bunch of times… but I’m still Chicken! LOL I got it to transfer my sons
name on his Cross Country and Track shirts… But I’m guessing I’m chicken and Lazy! Bad combo! LOL
Enjoy your cool Halloween pillows! 😉
Theresa
Theresa,
You can do it! Try a small project first, something you can throw away without really worrying about it. I think you’re going to do just fine, but if you try something super inexpensive and small first you can practice without concern. I know you can do it! You go tell it who’s boss!
~Joy~
P.S. Use a cloth napkin as a test for heat transfer vinyl! 😉
These are FABULOUS!! Your boys did a great job in picking the designs. 🙂 I have yet to use the heat transfer vinyl, but I love using vinyl on my home decor projects. I am definately going to order some of that vinyl give it a try.
Lori
Thank you Lori, Teresa K & Debby!
~Joy~
LoL – Ca-Caw! I love crow decor for the season. TFS!