It’s time to experiment, don’t you think? I bought some Avery Clear Decals for windows to see if the Cricut Imagine could cut and print on them. It was a success! Let me show you how it works.
")
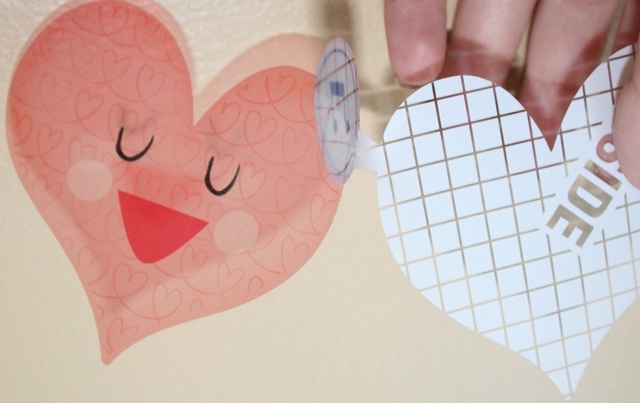
They come 3 sheets to the wind a pack. I laid a sheet with the printed side down on the mat. Specifically, there is a printed side that says “Image Other Side” on it. Put that side directly onto the mat. You want to print on the blank side. When you’re looking at the mat with your Avery Clear Decals sheet on it, you should be seeing the writing backwards. If you’re able to read it correctly, you’ve got it turned the WRONG WAY.

I used the Cricut Imagine Better Together cartridge for the image of the cute, singing heart. I cut the heart at 3 1/2″ and used the “Best Quality” and “Glossy” settings on my Imagine. You can certainly try other settings, but I only cut this once and what I used worked for me, thank goodness. One drawback of trying things with ink on the Cricut Imagine, like any printer, is that I always have that nagging feeling that I’ll be needing to buy pricey ink cartridges soon. I wish I had a box full of ink cartridges so I could just try everything.

Look how happy that heart is to be created!
Now that the heart has been born printed, the Imagine is cutting it out. I have my blade set at 5, but it could have been turned down from that. I love to cut on high settings, because that’s just me, but really it wasn’t necessary. However, every time I turn my blade down on something and it doesn’t cut all the way through I just want to kick myself all over my craft room. (Actually, I just say, “Grrrr…GRRRR!!!” aloud a bunch and I usually get over it.)
This heart transplant is going to be a success!
In this step, I am peeling the backing away from the clear, printed decal (the heart).
It’s been printed and is dry to the touch! It was dry pretty much as soon as it came out of the Imagine. I have to say “pretty much” because I didn’t touch it the very second it came out of the Imagine, but a few minutes later when I gathered the courage to touch it and not worry about it being ruined I found that it was completely dry. YAY!

“Wild Thing!! You make my heart sing! You make everything GROOVY!“
Try getting that song out of your head now.

I stuck that happy, singing heart to my Cricut Expression 2. There my Cricut Imagine sits behind it. The Cricut Imagine has a printable vinyl decoration on it. One cool thing about the Avery Clear Decals for Windows is that they can be peeled off and stuck on other things as well as windows. 😀 I hope you enjoyed this tutorial.
Now get to printin’ and stickin’.


This is sooooo cute. Love the Heart
Wow! You never fail to inspire me! I love this idea!!!! I can’t wait to try this!!!! Thank you so much for sharing! You have an amazing gift for thinking outside of the box and creating awesome projects!!!
this is super cute Joy!!!!!
TFS!!!
Joy, I am in total “ahhhhhhhhhh” (awe!) w/ you and the wild and wonderful ideas that you come up w/. LOVE it! TFS! 🙂
Joy,this is so cool,Going to try that!!That ink thing, I also keep thinking about!When will it run out?? Hopeful not when I am in the middle of a project! Joy
Oh I just love this Joy!!! I will have to find the clear decals and give this a try. I bet my DD’s would have a blast doing this too! Thanks for inspiring me!
Lori
Awesome, I’ll try this! Then I’ll work my way up to vinyl and magnets. Love the song “Wild Thing”, thanks for the flashback!