Vinyl Merry Christmas + Holly Transoms with Cricut Expression & Gypsy
I created this vinyl greeting and holly for my front and back door transoms!

This post will be photo heavy and writing light…at least I hope so because I’m eager to see if DH’s world famous steaks are ready yet!
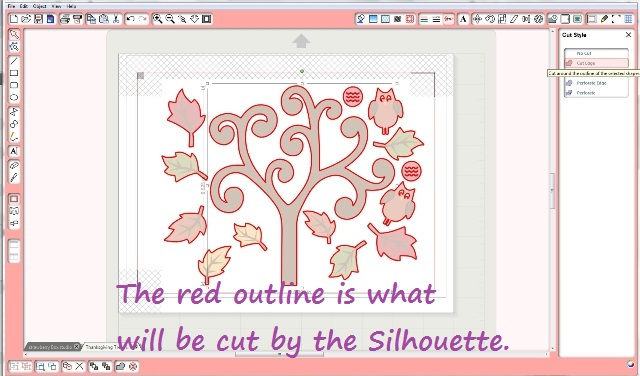
First, I created the Merry Christmas sentiment using Lyrical Letters and welded it with my Gypsy. You could use Design Studio to do this too. I made my design almost 2 feet long, so I used my 12×24 Cricut cutting mat.

Next, I laid my vinyl out on my 12×24 mat. Do you like that quilt? It’s “A Christmas Carol” themed. I love it! I used vinyl by Cricut. It comes in 2 – 12″x24″ sheets. So, it fit perfectly! Easy is so welcome this time of year.
Need help with your Cricut or Gypsy? These tutorials will help!

I cut this vinyl backwards so I could apply it to the inside of my back door. It looks better if you put it on the outside, so that’s what I did when I cut vinyl for the front door. Remember when I told you about weeding vinyl? Well, below I’ve done that again. Removing the excess vinyl is called weeding. You can just peel it up and pull it off with your fingers, but go slow”ish”. This isn’t like removing a band-aid really fast or anything. Keep scissors or a razor nearby for cutting away vinyl if you find yourself in a sticky mess.

In my last vinyl post about snowflakes for my back door, I didn’t use transfer tape. I put each snowflake on after pulling it straight from the mat. That wouldn’t be the easiest way to adhere long lettering like this, so I used transfer tape.
This is the transfer tape all laid out over the lettering. Now I can peel it all up and stick it to my transom. Yay! I used that craft blade to cut the transfer tape between the two words so I could apply them separately.
I also made this cutie little holly sprig using the Joys of the Season cartridge. I LOVE the way it turned out. I used brown, green and red vinyl to create this multi-layer. I just put each layer on the other until it was complete.

Here’s one door that I did. I had not applied the holly at this point. Also, I was standing in pouring rain to get this photo, so that’s why everything looks like it’s melting.

Here’s part of the other door I did. On this door, I applied the vinyl to the outside.

Here’s a better picture of the final product. I really like it!!
Want to learn how to use vinyl with your Cricut to create all kinds of things? Check out my Cricut Vinylology DVD!
Check out my Cricut Pinterest board!
This is really great! Can’t believe how cool the Holly turned out!
Really really cool!! It looks very nice. Good Job!!
Thank you!! 😀
Love it! I haven’t tried the vinyl yet, I am assuming you
have to use the heavy grade cutting apparatus? Also did
you say you can get 12 by 24 paper at Hobby Lobby?
We don’t have a Michaels but we do have HL…I have been
wondering what to do with my bigger mats.
Thanks Joy
Thanks, Heaven!
Actually, you just need your regular (not deep cut) blade to cut vinyl. 😉 Yay to that!
Yes, I have found the 12×24 paper at several Hobby Lobby’s. Look on the stands in the aisles where they have the Cricut items. The paper should be there.
You’re Welcome! 😀
~Joy~
Joy,
I just seen your jingle ornament and from there I came here.
I think your door turned out fabulous.
Thanks so much for sharing such great ideas
Stacy
This looks awesome. Can you save the vinyl for use again?
quilt 4 fun 2 at hot mail dot com
Janet Licari,
I do show a way to make some reusable vinyl creations in my Cricut Vinylology DVD, however once you stick vinyl down like I have on my windows, you really can’t use it again. 😉
~Joy~
That’s beautiful. What are you plans to decorate this year? Is the vinyl easy to remove? We live in a rental so it would have to be easy to take off after the holidays.
Shawnee
How does the adhesive vinyl work for removing and reusing? I’m making a calendar project (the calendars are glass) and would like to use vinyl “months” but they would be used and removed a lot. Any hints or suggestions??
Hi Amy, instead. You’ll be able to craft with that and remove it.
Vinyl is really a one time use thing when it comes to using it on widows, paper and most surfaces. It will not be reusable after removing it from glass. It sticks very well to glass and is ruined during removal. You might try Post-it Craft Paper
Happy Crafting!
~Joy~
Joy, you out did yourself, love it. Thanks for the idea on how to use the vinyl and window decorations.
[email protected]