Quick Glitter Bling Embellishments using Paper Punches and Glue Dots

I broke my no glitter rule to make this fun embellishment.
I was super happy to discover that the XXL Glue Dots can be punched out using a paper punch! Isn’t that cool? I was afraid it wouldn’t work but what was the harm in trying? I figured I could sacrifice a punch to try it…and/or my hands in case it was really hard to punch through. I was surprised and pleased to find that it didn’t mess up my punch AND it wasn’t hard to punch through at all! YAY!
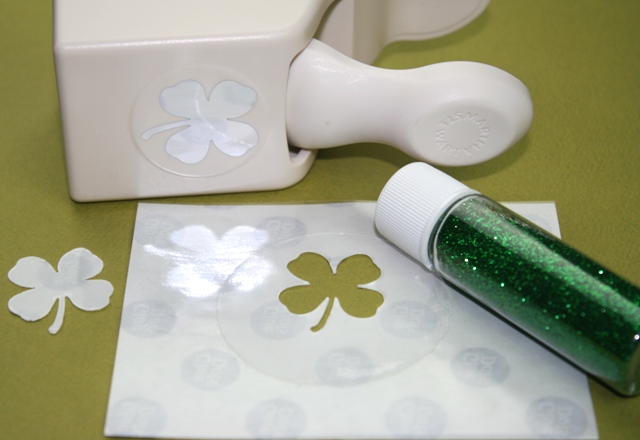
All you need to try this is a paper punch, an XXL Glue Dot and glitter. You could try the XL Glue Dots too but I’ve only tried the XXL’s so far.
I just had to have that Martha Stewart 4 Leaf Clover punch last year. Then I didn’t use it until this year. Can I roll my eyes at myself? LOL!
It’s so easy to make a quick embellishment for cards, scrapbook pages or for any crafty need you have! I would test the finished product before slamming it shut in a scrapbook though. You want to make sure you don’t have any areas not covered by glitter so it’s not still sticky.
How to Create Glue Dot Paper Punch Embellishments
1. Using your choice of paper punches, simply punch through an XXL Glue Dot® .
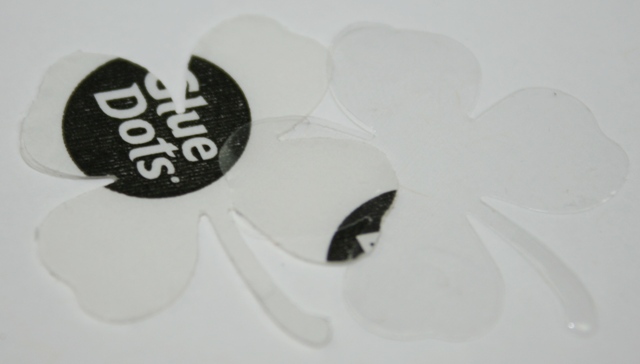
2. Carefully peel the backing off of one side of the punched out Glue Dot® and stick it to the surface of the item you want to decorate.
3. Once the Glue Dot® is stuck to your preferred surface, peel the other backing off of the final side.
(under the glittery photo below are the rest of directions)
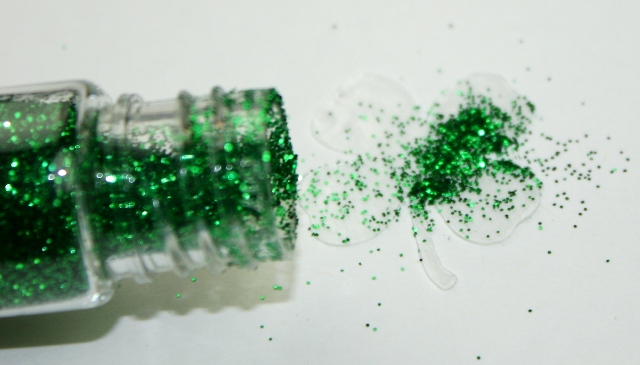
4. Pour glitter onto the exposed sticky side of the Glue Dot®.
5. You now have a beautiful and glittery embellishment!
That was so easy!
I wrote this blog post while participating on the Glue Dots® design team.

What size are those glue dots?! They look humungous! Neat idea — I would’ve been afraid to try punching through one because I wouldn’t want to risk losing a punch. Thanks for checking it out and reporting in to us. I’m glad it didn’t break your punch.
Cathy,
They are huge! They’re the new XXL Glue Dots which are 2 inches. I used them in this post too: https://joyslife.com/easy-floral-tealight-candles-for-tablescapes-and-parties
Have a great day!
~Joy~
Cute idea! Glad you tried it instead of me! I would be afraid to mess up one of my many precious punches! LOL
And I’m just like you Joy! I always HAVE to HAVE a punch then I don’t get to use it until the following year!
Mainly cuz I wait to long to get it in the first place!!! Always saying I need or want that such and such….. then I wait to long thinkin’ about it and then that holiday or whatever is over with…. And I finally get the item I’ve been talkin’ about then I don’t use it until the next year! CRAZY!! I KNOW! But don’t worry…. I WILL NOT do that with my NEW SILHOUETTE!!!! I’m sooooo gonna use that baby! LOL
Theresa
Thanks for the tip! I’m like you in that I love the look/hate the mess of using glitter. But at least with this technique, you don’t have to wait for glue to dry! Another reason I love glue dots!
P.S. I hope no leprechans were injured in the shaking to procure the green glitter! LOL- love your sense of humor, too!